All our dreams can come true, if we have the courage to pursue them.
The way to get started is to quit talking and begin doing.
When you believe in a thing, believe in it all the way, implicitly and unquestionable.
We keep moving forward, opening new doors, and doing new things, because we’re curious and curiosity keeps leading us down new paths.All our dreams can come true, if we have the courage to pursue them.
The way to get started is to quit talking and begin doing.
I know it’s been a while since I wrote on my blog. Things have really been heating up. Over the last two weeks I have been pretty busy learning HTML, CSS, and some Java. What do these three things have in common? Well, for starters they have allowed me to create a local website. Yes, local being that it is strictly to my computer but is also published on my GitHub. In this post I’m going to walk you through the bare bones version of my restaurant. In the next post you’ll see the restaurant again with more CSS implementations. The post after that will include CSS and Java implementations. So essentially you will see the gradual evolution of my restaurant and the changes made within the code.
I am attaching the link to my restaurant. All images are reserved to me as they are taken by me. Meaning that they don’t belong to another party other than myself. I am the sole producer of them and I had fun taking them.
I’m going to very briefly gloss over Github. I created a Github account and created my repository. This repository will hold all my information.
The first step that we needed to do is establish our HTML. In order to do that we need to use a text editor. In my case I liked Atom so that is the editor that I will be using for all my coding exercises/projects. I like atom as it is easy to navigate and it also does auto complete. I don’t necessarily like that and yes it can be turned off. However, with learning a lot of new things I find it to be helpful in regards to completing my thought process.
After opening Atom, I created an HTML file called restaurant.html. This is going to be my home page for my restaurant. I created three more html pages for home, menu, and contact us. In each of these pages I am going to add different things that I want to be displayed. The key thing to remember is that in order for them to work you must link them. It is an easy mistake to make, I did it a few times as my restaurant progressed.
Now the fun begins, I’m going to start writing my code. Keep in mind that for the next three additional HTML pages you must start from scratch and add from their. First, I’m going to establish this document as an HTML. To do this I will type <!DOCTYPE html> . This establishes that this is an html file. Then we will type <html> and then <head>. In HTML we will use the syntax <head> and then add a title to. <head><title>title page</title> </head> But what exactly does this do? Well, it adds the title in this case title page to your tab. Still confused, no worries. For example, you open google chrome. When you open it a new tab page opens. In the tab bar it says new tab. That new tab you see within the tab that is your title. That is what you have called that tab in you head. In my case I named my title Home Page. After I establish this title you need to close it out. By doing this your telling the computer that you ended said command.
The next step is to add a body. This goes underneath are head. <head><title>Home Page</title> enter <body> To do this we are going to use <body> and when we are done writing in the body we will close it by writing </body>. In the body I’m going to add a header to my page so that when someone views the page it will say Gaston’s Tavern and Restaurant. To add a header I need to establish it. <header><h1 align=center><b><i><span style=”color: Red”>Gaston’s Tavern & Restaurant</span></b></i></h1> . Whoa, that’s a lot of code. Let me break it down for you. So first in my header space I am creating my header. In HTML their are six headers H1-H6. The higher the number the bigger the text of header is. Think of it in terms of importance. If on my list I have something that is number 1-6. I would want to complete the first thing on my list as it is the most important and the other things can wait. In HTML it’s the same concept, the closer to six the smaller the header becomes. The next command align=center will center my text. The <b> and the <i> are for bold and italics. So, span style is an inline text form of CSS. It allows us to add CSS features to our line of code. It will not apply to our other code unless we manually enter this code again or actually create a CSS page and implement the codes to select code under certain areas, but that is knowledge for later on. In this case it will turn my Gaston’s Tavern & Restaurant the color red. In this case for the color you can use hexadecimal code or colors that are already established in CSS. Next, we will close out the code and close the header. At the top of the page it should show Gaston’s Tavern and Restaurant in the center of the header, it should be bold, in italics, and red. If it is than we were successful.
Moving along, I’m going to create my navigation bars. These are links that allow me to access my other html files. To do this I use <nav> which stands for navigation. Than I used the command <hr /> which stands for horizontal rule. What this does is add a horizontal line break between your code. The next step is to create a
. A div can be used to execute a certain code for a section or be a container of information. Here is how my code looks keep in mind for this I’m not hitting enter but every line of code should have it’s own line.
HomeMenuContact Us Great! All my HTML files are now linked to my restaurant.html. Before I close my div I’m going to add an and than close my
. Now a line should appear between the header, my links, and the rest of the body.
Now, I’m going to create a second div within my body. Before we go further, you can have multiple divs. Now I’m going to add an image.
Okay, so let me explain. I uploaded my picture from my camera to my repository. Once it appeared in Atom in the assigned repository I was able to access the image. So now, I want it to appear on my HMTL file. To do that I used the command img src which is short for image source and the name of my image and it’s extension. Please make sure your extensions are accurate! I added alt, which will only appear if my image isn’t correct, missing, extension wrong, etc. Then I added the width and height of my image. This will display the image based on the information above. There are many ways to use width and height but I won’t be covering it in this project. Next, I will close my
. You should now see the image in the exact spot as the width and height coordinates within the body.
Moving right along, I am going to create another div to hold restaurant’s description. I’m not going to spend to much time explaining this. I’m creating five paragraphs to describe my restaurant and assigning them a color.
Restaurant Details
Welcome to Gaston’s Tavern & Restaurant!
Here at our establishment we are excited to meet your every desire.
With that in mind we have created a very diverse menu to let you expand your palet.
We hope that you enjoy your meal and dine with us again!
. You should now see my restaurant’s description below my image.
The next HTML file we will be working on is my Home.html. As I stated before, I will only be discussing the things that are new/added that were not included in the first page. Now why did I call this file Home.html? Well because this page is just there to refer you back to the home page. Silly, I know but it was what the project asked for so I delivered it. So on this page in the <head> I am changing the title. <title> Return to Home </title> </head>. The top of the tab will now read Return to Home.
I followed my earlier steps and added my header within my body. Now I’m going to add something that wasn’t there before. I’m going to create a link that when pressed will take you back to my Home Page. Before I do that, let me create a paragraph to let my user know how to return to the Home Page. <p align=center><b><span style=”color: Red”>Click the logo to go back to the Main Menu!</span></b></p> Hmm, what logo? Well, we are going to add an image which is my “logo” to go back to the main menu. The steps are very similar to the previous ones for adding an image but this has some variation. <a href=”restaurant.html”> <img src=”gtavern3.png” width=”400″ height”150″> </a> Please note this is in a div. Now that I closed my div, I should see my image. If I click on the image or “logo” it should take me back to the Home Page. Perfect! It worked. As I did before, I will add the footer and I should see information about the location of my restaurant and any other important information.
Menu.html
The next HTML file we will be working on is my Menu.html. On this page I will be changing the title within my head to say Menu. The next thing I will do which is different will be to add right underneath my body my link to go back to my Home Page. To do that I will use <a href=”restaurant.html”>Back To Main Menu</a>. This link should appear in the upper left hand corner of your screen before your header. I will add my header underneath it before creating my navigation bar the same way as we did before. The next thing I’m going to explain to you which I totally messed up on and didn’t get it spot on until my third attempt at this is a table. My table look cool to me but it is a mess. So, look at it and enjoy but note that this table is the first attempt I made hence the rawness. A table, sound simple it was not, well at least not to me. It took three plus attempts to nail it the way the project required. But I kinda like it the way it is, but it changes over time. Anyway, to create a table we use the <table> command. In my case I used <center><table width = 100%> This was to center my table and make the table width 100 percent. It didn’t exactly work but it will do. In this case I used <tr> and <td> which are table row and table data. In my case I created two tables and used these command to create content within them. I also inserted an image between the table using a div. I’m reluctant to show the code as it is all over the place. It appears that one table’s contents go left and right. The following table has an image and text goes left and right and the last item in the table goes center. I closed my tables each time I finish with them before closing out the rest of my code.
Contact Us.html
The last HTML file we will be working on is my ContactUs.html. Which by far I think was the hardest. The reason being that it had many moving parts. By that I mean I had to create a contact form that actually resemble a contact form. It was a lot of work on of which has kept developing and made feel good as I overcame a hurdle. On this page I’m changing the title within the header to say Contact Us. I’m creating the same links above to return the home page and my navigation menu. Now, comes the hardest part meeting the expectation of the project and getting the form to it’s expectations. But we can do this. Let’s start by creating a div for our form. The div is going to align the text within it. We have used this code before above.
Now let’s create our form. <form action=”submit.html” method=”POST”> What does this mean? Well, in my case this doesn’t do anything as their is no PHP and no submit.html. What it is supposed to do is send the information using the html to an email again you need additional things to do this such as PHP. Which, I have not been introduced to yet. The next step is to actually create the form. <label for=”Name”>Name:</label> <input type=”text” id=”firstName” name=”firstName”> <br /> <br> <label for=”Email”>Email:</label> <input type=”text” id=”email” name=”email”> <br /> <br> <label for=”Phone”>Phone:</label> <input type=”text” id=”phone” name=”phone”> <br /> <br> So here we are creating our different labels for what we want it do, specifying the type of text, and it’s personalized id. In each of these we are telling the form this is the name, the type of input will be text or numbers. Than to create space we are using the break command. This is good for spacing everything out.
Moving along now we will create our contact portion of the form. <label for=”contact”>Reason for Inquiry:</label> <select id=”contact” name=”contact”> <br /> <option value=”default” selected>Catering</option> <option value=”Private Party”>Private Party</option> <option value=”Feedback”>Feedback</option> <option value=”Other”>Other</option> </select> <br> Above we are creating are setting options in a drop down menu for the user to chose from. By default we are selecting Catering. To do that we set the option value to default.
The next thing is to create a label for additional info and setting it to text for anyone who wants to add additional comments. <label for=”info”>Additional Information:</label> <textarea id=”info” name=”info”></textarea> <br> <br>
Next, I’m going to create a label to ask my user’s if they have ever been to my restaurant. With this I am creating a radio button for yes or no. With a radio button you can only make on selection. In this case I set checked which is our default to no. <label>Have you been to the restaurant?</label><input type=”radio” name=”answer” value=”no” checked /> No <input type=”radio” name=”answer” value=”yes”/>Yes <br>
Now, I’m going to set up a choices for my users to tell me what day is best to contact them. In this case I did not set a default. By using a checkbox as my input type the user can select more than one option. Which differs from our radio options. As I said before with radio buttons it is either one or the other but checkbox can have multiple options. <br> <label>Best days to contact you:</label> <input type=”checkbox” name=”myChoices” value=”M” uncheck/>M <input type=”checkbox” name=”myChoices” value=”T” uncheck/>T <input type=”checkbox” name=”myChoices” value=”W” uncheck/>W <input type=”checkbox” name=”myChoices” value=”Th” uncheck/>Th <input type=”checkbox” name=”myChoices” value=”F” uncheck/>F <br>
The last step before closing everything out is to create a send Request. You can add a button later on that is interactive. In this case the Send Request will do nothing or give an error as it redirects. <br> <input type=”submit” name=”Send Request” value=”Send Request”> </div>
Now that I closed everything out we should be good to go. Everything is in sync and I can navigate my pages and see their contents from anywhere in my HTML. What a success!
For anyone attempting this for the first time, my advice is cut yourself a break. I had limited time to do this and was really stressed out. Take your time, and explore. Don’t let your obstacles hold you back and ask for help as you need it. I look forward to seeing where this journey leads us.
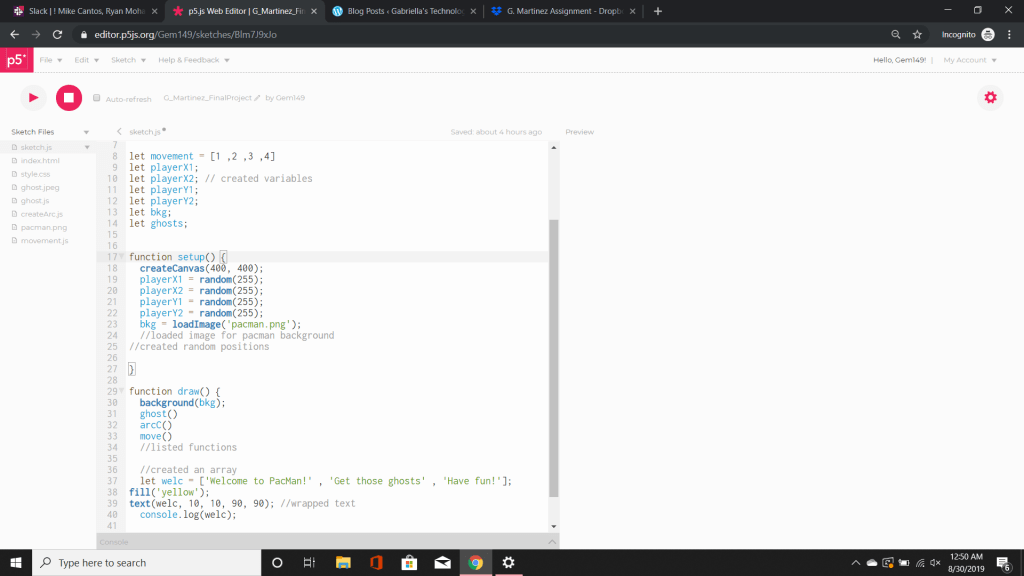
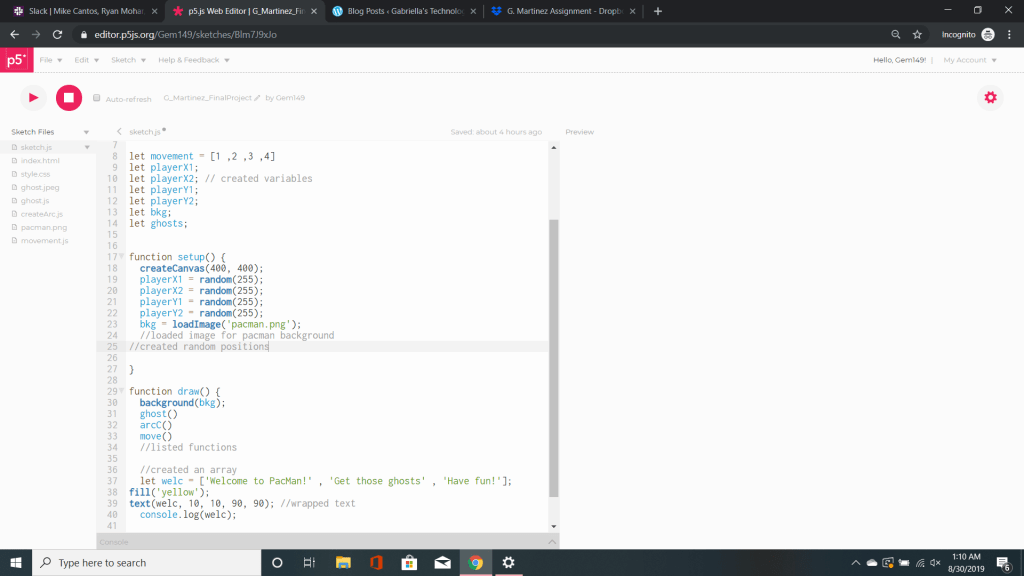
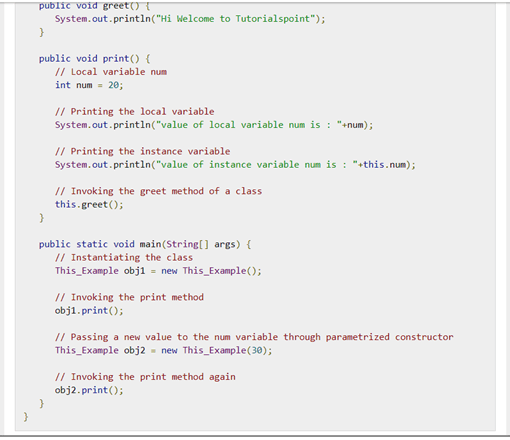
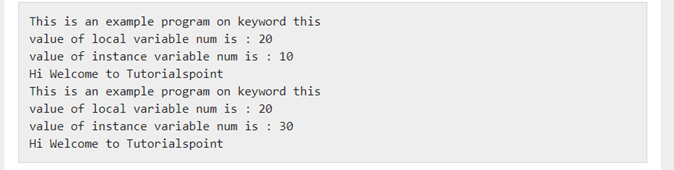
My final project was a collaboration project to create pacman. I worked on this project with my classmate Arbel. What I liked about working as a team was it allowed me to work on my strength and weaknesses. By having a teammate at my side I felt like I learned a lot and even brushed up on things I didn’t know. We both had certain skills and knowledge to offer. I liked that we were both patient and put our work aside to go over things the other might not understand.
To most people our pacman game is going to be a little unconventional. We have a pacman who can move with the mouse across the screen to gobble on the poor ghosts. Our ghosts are psychedelic look and they constantly change colors as they try to flee using the mouse keys.
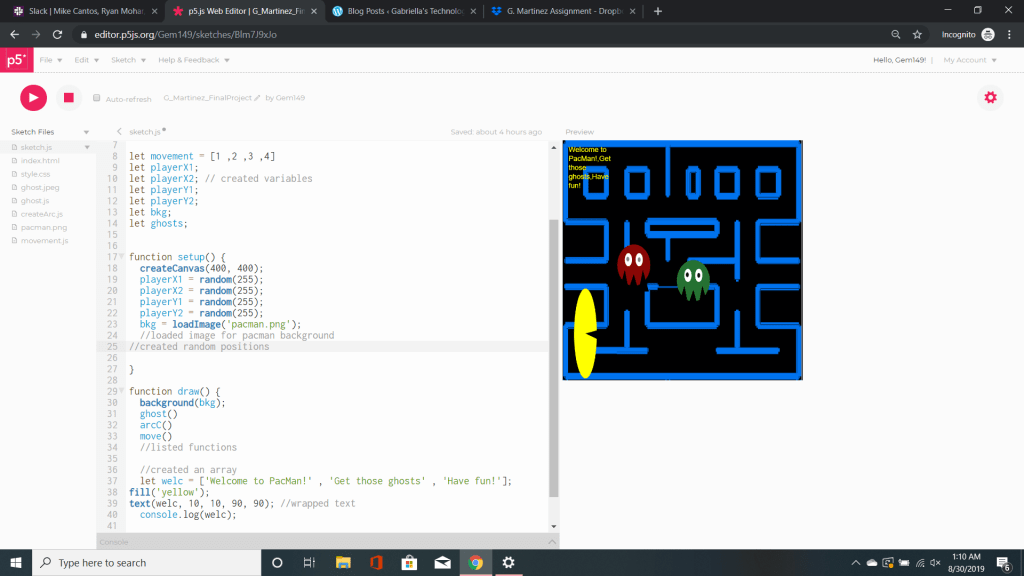
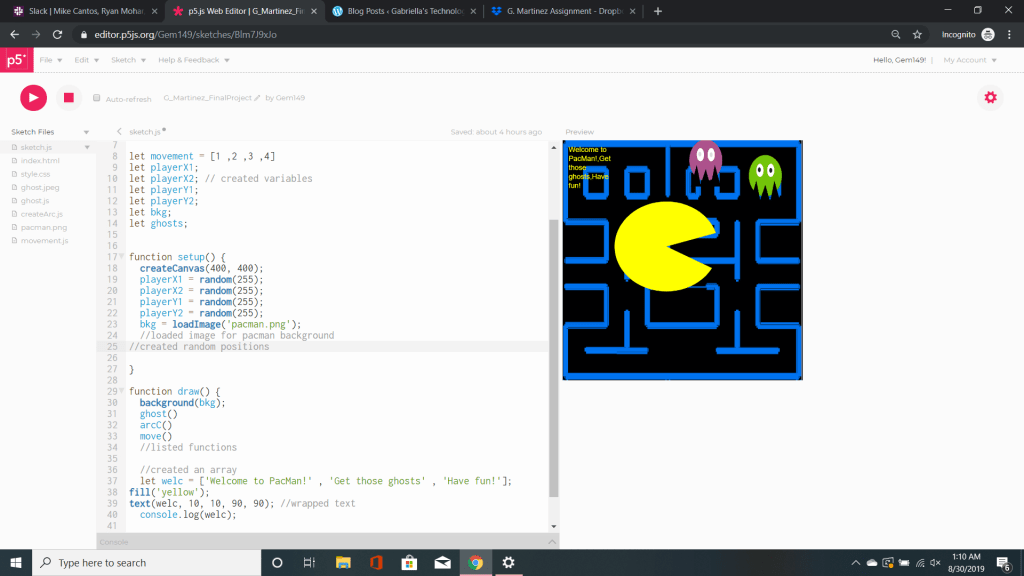
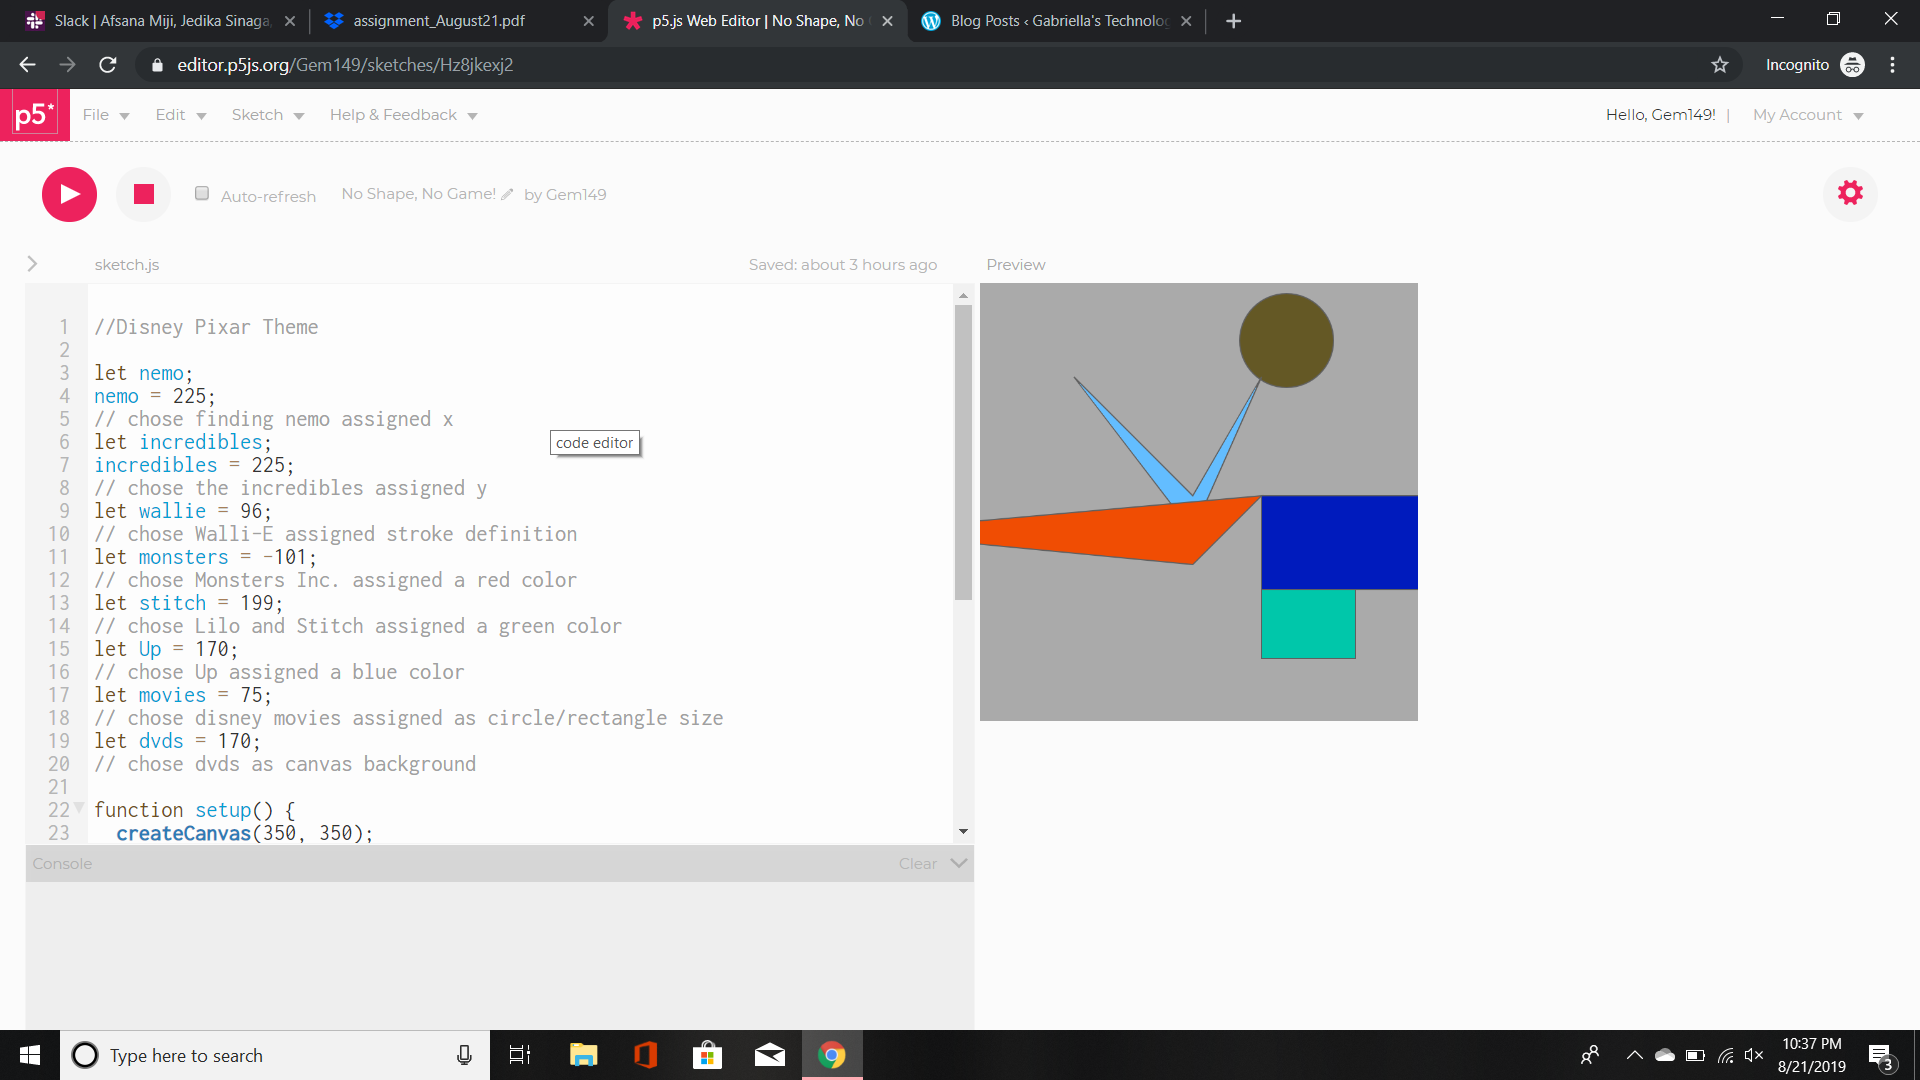
The image you see above is my collaboration code for pacman. The first step was to assign variables. Variables are empty place holders for our values. These values can be numbers or string. In this case most of our variables are not assigned as we will assign them later. After creating our variables we move onto our setup function. In our setup we begin to start assigning values to our playerX1, playerX2, playerY1, and playerY2. We set them as random values as at this moment it doesn’t matter what happens to them. The next step we did was to assign our bkg which is short for our made up term background. We then used the code loadImage to download a file. To do this we found an image and saved it to our computer. We then went to sketch – add file – and drag and dropped the image. Once it loaded it is displayed in the left hand corner of the screen as either a jpeg, jpg, or png. Now that we have done that we can move on to the draw command. In here we looked at the word background and assigned our variable bkg. What this will do is assign the loaded image to our canvas.
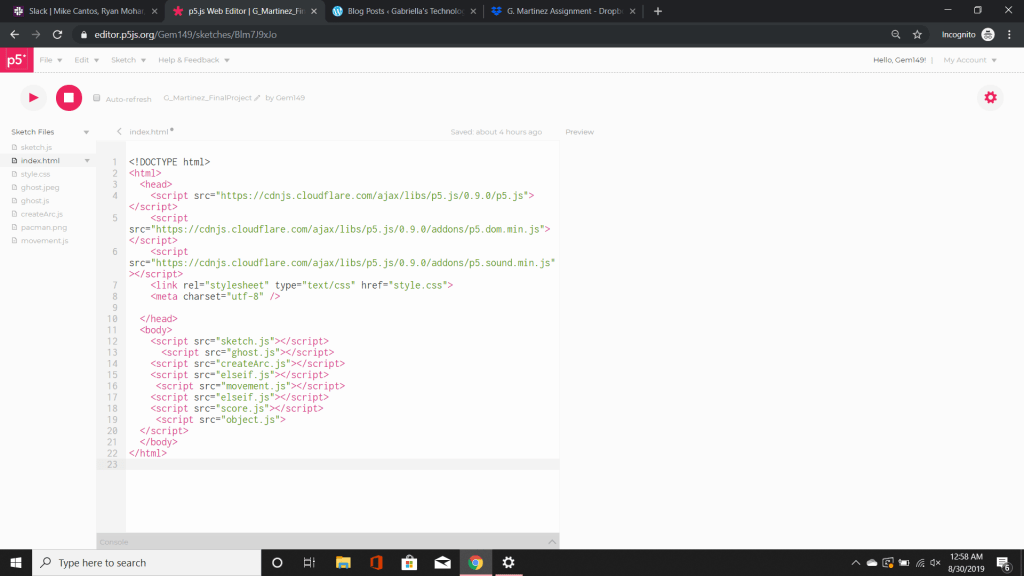
The following things you see under background are our functions that we created. These functions were created in other sketches and linked via our HTML. This allows them to be accessed by the main sketch and executed.
What you see above you which may appear to the naked eye as blank is actually our downloaded images. These are the images we uploaded so that we can use as our background.
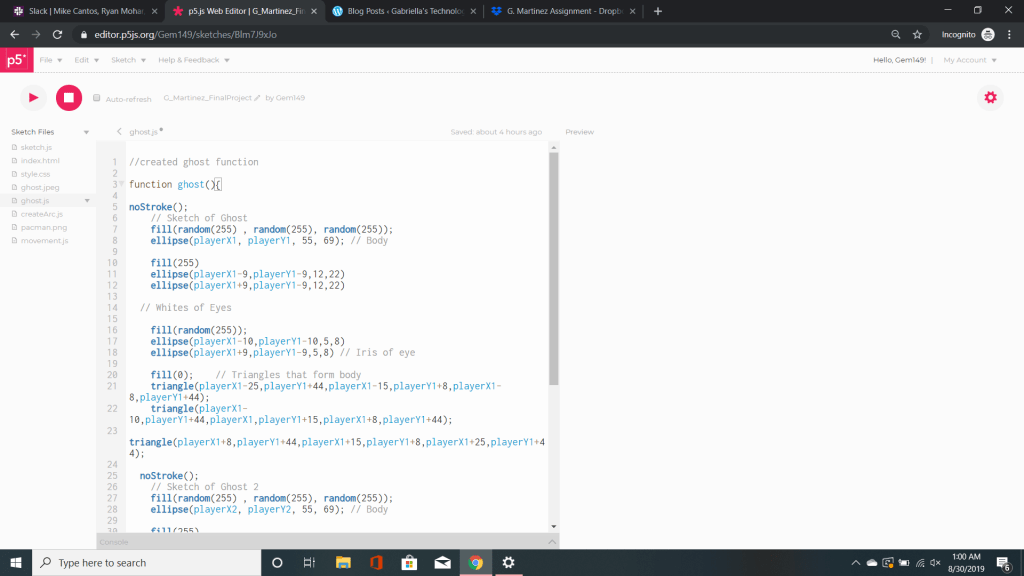
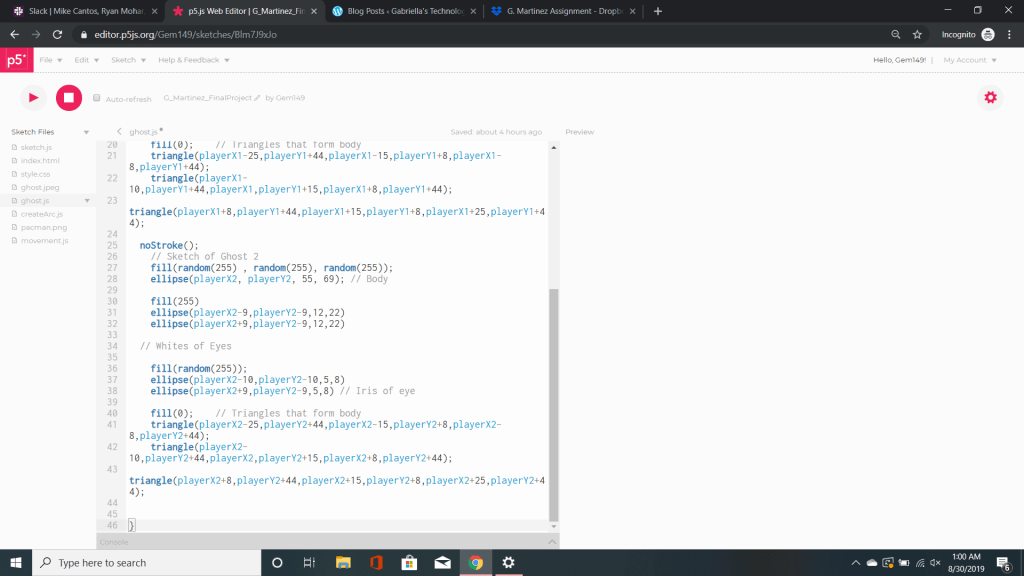
The next step we did was create a function called ghosts. Inside of ghosts is our code for our shapes. These codes when loaded together will make our ghosts appear. To give the ghosts a psychedelic look we assigned the fill to random. What this will do is every time the code is reset the color and starting location of the ghost will change.
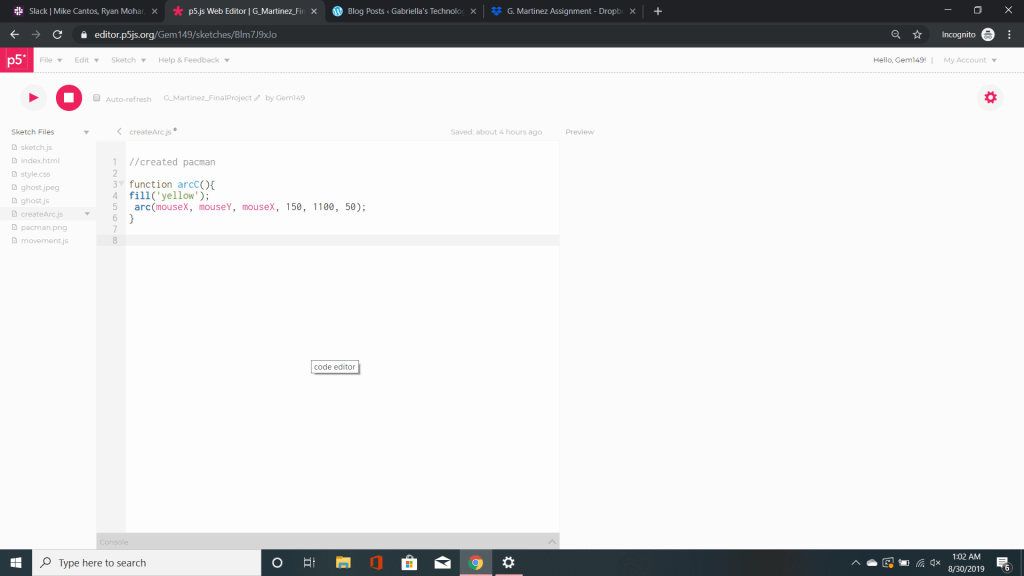
The next step was to create a function called arc. Arc is a command to call/create a shape to make pacman. An arc consists of six coordinates x, y, width, height, start, and stop. In this case you will see we filled the arc with the short hand reference for yellow. It will create a yellow arc on the screen. We then used a predetermined code called mouseX and mouseY. These two code allow us to move our arc anywhere across they x and y axis with our mouse.
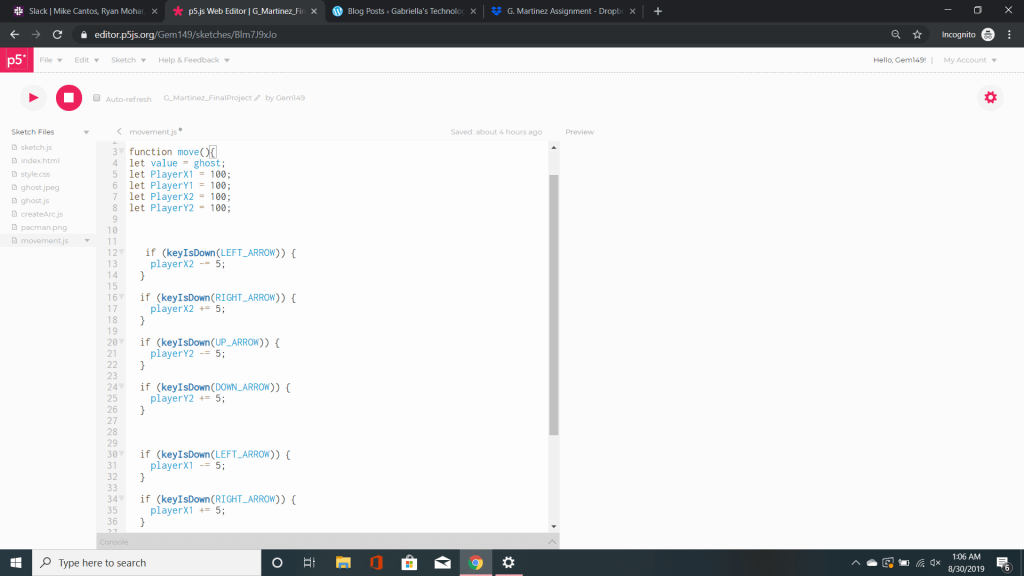
The next thing we did was create a function name move. This function is designed to help our ghosts move. We assigned our variables to a number in order to make our ghosts move. There are two things going on here. One is an if statement the other is keyIsDown. An if statement uses boolean logic to check if a statement is true, if it is the code is executed. In other words if this is on sale I buy it. The other thing we see is keyIsDown which also deals with boolean logic. In this case if a key is pressed the x increases by five while y decreases by five. This is what helps our ghosts to appear as though they are moving.
Referring back to the top page we see all our linked functions.There is also an array here. This array will allow us to store multiple strings or numbers. In this case our array says Welcome to Pacman, Get those ghosts, and Have fun. I filled the text with the short hand reference for yellow. I used the text command to display the array on my screen. What makes this specific text interesting is that I used a wrap. What this does is moves a line of text that doesn’t fit into a wrap style. What it looks like is a paragraph in the left hand corner. I also logged the command to make sure it’s contents were displayed.
Overall, I had fun with this assignment. However, my partner and I ran into our fair share of problems. Most of them we were able to tweak, while others just weren’t solvable. Part of this assignment was to make a constructor. We created a constructor but kept getting an error saying the constructor was undefined. We read multiple text and watched multiple videos to no avail. In the end we had to scrap it in order for the code to work. At another point in time I would like to update/retry this again and hopefully get a better result. I want to thank my partner for teaching me and fixing my weaknesses.
1. What is P5? How is it distinguished from Processing?
P5 is a java script library used for processing. Processing is used for coding adding a visual design. It is good for those who are artist, educators, and even those who are just starting out to learn code.
2. What does IDE stand for? Describe its components.
Integrated Development Environment. IDE contains a code editor is used for debugging and logging code. IDE is a full suite of tools used as by developers.
3. How do you save a file in the P5 web editor? What naming/saving convention might you use?
First you should name your file in accordance to what you are working on. You can save a file by using command + s key. Or you can go to the top left corner and click the tab file and save.
4. What is a library? How do you access and use a library with P5?
A library is a collection of functions and methods within a coding language. You can access a library in p5 by pulling up the p5 reference and selecting libraries.
5. What do the shapes/buttons across the top of the P5 editor represent?
The triangle shape represents play which will run your code. The square represents the stop button which will stop and reset your code.
6. How do you add and name an additional or new tab in the P5 editor?
You first would go to Sketch – Add File – Create FileName.extenstion or you can drag and drop your file from anywhere in your computer. Then click submit and it should appear in your tabs on the left side of the screen.
Coding Basics
7. Describe the coordinate system in P5.
The coordinate system in P5 is based on (x,y). X runs from right to left. Y runs from top to bottom.
8. What is the general syntax and structure for a line of code? Use code to demonstrate your response.
The general syntax for a structure of line code is a keyword = (value + or – operator.)
ex: let x = (8 + 9) ;
9. What is the general syntax and structure for a block of code? Use code to demonstrate your response.
The general syntax for a block of code is to group multiple lines of code.
ex: function draw(){
let x = 5;
background(“yellow”);
ellipse(x, 100, 100, 100)
}
10. Why are certain words in different colors in the P5 editor?
Certain words are different colors in P5 due to whether the value is preset and recognized by P5 or created.
Ex: Width (PINK) as it is a recognized Java Script
ellipse (Blue) as it is preset function recognized and created by P5
11. What is a system or reserved word in P5? Give an example.
A system or reserved word is a word that is preset by P5 or java script.
Ex: Height
12. How does order matter in P5? Give an example demonstrated with code.
Order matters in P5 because it determines how the code is to be executed. If the order is all over the place something may not run as planed or you might get an error.
Ex : function draw() {
background(0);
ellipse(10, 10, 10, 10);
}
function setup (){
background(255);
createCanvas(400,400);
}
In this example by putting draw first it overwrites the background and the shape. Additionally, it doesn’t show a canvas to be displayed.
13. What is the difference between mouseIsPressed and mousePressed()? Use code to demonstrate your response.
mouseIsPressed – based on boolean system of true or false
14. What called function must always be first in setup()?
createCanvas must always be called first in setup.
15. What is the difference between an inline comment and a block or multi-line comment? Use code to demonstrate your response.
Inline comment only comments out a single line of code
Block comment out a long line of code.
ex: // the cat is in the hat
ex: /* the cat has three hats
he doesn’t know which one he should pick
*/
16. Does whitespace matter in P5? Capitalization? Use code to demonstrate your response.
Yes in P5 you can only have white space in a string otherwise you will get an error. Capitalization should only be used when defining a variable as industry standard.
ex : let circX = 5;
ex : let myCirc [“The cat is in the hat” , “What a funny cat”];
Variables, Operators, Logic
17. What is a variable? What is a data type? What is a value?
A variable is a storage container that can hold a value. A data type refers to how the computer reads the vale. Value is the number or string assigned to the variable.
18. What is the difference between a system variable and one that you define? Use code to demonstrate your response.
A system variable is a variable that is already defined by P5. Whereas, one that you define you are creating the value.
ex: mouseY ; width;
ex: let x = 99;
19. What is scope and how does it impact code? Use code to demonstrate your response.
Scope is the way in which your code is placed. There are two types of scope local and global. Global being that you can access the code from anywhere in your program. Local is set to the object or function in which it is placed in. If you try to access a code that is local you would need to know where it is and give permission to access it. Whereas global your computer can assign it and find it easily, however, it eats away at your speed.
ex: let x = 28;
ex: function circX(){
let myCircle = 25);
}
20. What does it mean to declare, initialize and use a variable? Use code to demonstrate your response.
Declare a variable is to create a variable.
Initialize is to give a variable a value.
Use a value is to test/debug an a variable.
ex : let x ;
let x = 0;
console.log(x);
21. What happens when a variable is attempted to be accessed outside of its scope?
You may receive an error message saying that variable.name can not be found or you will get a message saying undefined.
22. What happens when a variable is declared globally, but is not used?
Nothing happens if a variable is declared but no used. However, it should be commented out or deleted so that you don’t confuse another reader.
23. What value does let nums; have?
In this case nums has no value or is undefined as there is no follow up code assigning a value too nums.
24. What are operators in P5? Use code to demonstrate your response using at least one operator.
An operator in P5 is a math function.
let num = 5;
let results = num + 5;
console.log(results);
25. What is a boolean data type?
A boolean data type is a condition that results in true or false.
26. List three examples of primitive data types.
Boolean, String, and numbers
27. Write a code example that increments a value by 5.
x = x + 5;
28. Describe the order of operations for: x = speed * 40;
The first step to think of when using operations is PEMDAS. (Parentheses, Exponents, Multiplication, Division, Addition, and Subtraction.) In this case we have a value x that is set to speed. But we don’t know what speed is. All we know is that we are taking forty and times it by speed. The result of speed times forty will equal x.
29. Write a code example that decreases a value by one using shorthand.
let x = 3
function draw() {
x -= 2;
}
30. What does the logical operator ! do?
The operator ! is used for the word not. If placed in front of a true statement it would be come false. Essentially it negates/reverses the decision or outcome.
Control, Iteration, Structure
31. What is an if statement? When should it be used? Use code to describe its syntax.
An if statement is a conditional statement used to find multiple outcomes in your code. It should be used if you are trying to find out the result or outcome of your code. An if statement essentially says if this is true execute code.
ex: if((circX > width || circX < 0)){
ellipse(255, 255, 100, 100);
}
32. How many if statements can you use? What is an alternative to the if statement?
You can use as many if statement as you would like, however, the more you use them the messier or more confusing your code can become. The alternative to an if statement is the else if statement which can include multiple lines of code.
33. What is the difference between else and else if? Use code to demonstrate your response.
Else can be only used once and is has two different outputs depending on whether a condition is or is not met. An else if uses multiple lines of code and can be repeated often. An else if statement has a condition and an outcome. If that condition is not met then the else if command will introduce another condition that will have another another outcome.
ex: else
if(x = 2, x > 2; x++){
rect(122, 122, 100, 100);
}
else (x > 5) {
circ(100, 100, 100, 100);
}
ex: else if
if (y = 9; y > 11; y++){
ellipse(123, 123, 45, 45);
}
else if(y >= 9){
rect(122, 122, 33, 33);
}
else (y <= 15){
console.log(“That’s to bad”)
}
34. What is the difference between code with several consecutive if statements and code with several else if statements?
In multiple if statements the code will check to see if the condition is true or false. If true the if statement will move on to the next condition. In multiple else if statements the code will check to see if the condition is true or false. If false it will move onto the next condition.
35. What is a while loop? When should it be used? Use code to describe its syntax.
A while loop is used to repeat a line of code multiple times without ever having to rewrite them. It should be used if you want to create a mass number of shapes in no time.
ex: let x = 0;
while (x < 20) {
rect(x * 10, 100, 50, 50);
x++
}
36 What is a for loop? When should it be used? Use code to describe its syntax.
A for loop is an advanced form of the while loop.
for (let y = 3; y < 9, x++) {
rect(122, 33, 44, 99);
}
37. Write code that uses a nested for loop to draw a grid of squares across the x and y axis of a canvas.
A nested for loop is a for loop in another for loop.
function draw(){
background(random(255));
for (let i = 25; i < 30; i++){
circle(11, 11, 12, 12);
for(let j = 22; j < 25; j++){
rect(27, 27, 55, 55);
}
}
Functions
38. What is a function?
A function is a block of code that gives a set of commands to be executed.
39. What is the difference between a function or method built into P5 and one that you define?
A function or method built into P5 is already predefined and created to do a certain task. A function that you define is a function that you created and assigned a name too. In that function you create conditions, shapes, loops, etc that you want executed.
40. What does the keyword function mean?
The keyword function means that you are creating a function do said task.
41. What does the keyword return mean?
The keyword for return means that it will return the value of input back to you.
42. Write code that uses the keyword return.
ex: function myCirc(){
let value1= 5;
let return = 2;
}
let returnValue = myCirc();
console.log(retuenValue);
43. Write code that uses a defined function (by the user) and call or use it.
function draw(){
yourCirc()
}
function yourCirc() {
fill (random(255));
ellipse(23, 23, 44, 44);
}
44. What is the distinction between function and method?
Function – gives a set of commands/conditions to be executed
Method – is an object oriented programming; refers to the conditions/commands within an object
45. What is the distinction between argument and parameter?
Argument – is a value you place in a parameter
Parameter – is input you place within a function
46. What do the () in a function call or definition indicate?
The () in a function defines the parameters and arguments.
47. What will happen if you call an undefined function?
Nothing will happen if you call upon an undefined function. It will just stay in your global space. I would recommend to comment it out to avoid any confusion later or to your reader.
48. What will happen if you define a function, but do not call or use it?
Nothing will happen if you do not use your function. I would recommend commenting it out to avoid confusion later. If you decide to use the function later you can always remove it from your comments.
49. What concept is a function useful for?
The concept a function is useful for creating objects, methods, and classes.
Objects/Classes, Arrays
50. What is an object?
An object is a storage container that holds complex data types, values, properties, and functions.
51. What data type is an object?
An object is a complex data type that stores numerous values and properties
52. What concept are objects, classes/constructors and arrays useful for?
Objects, classes/constructors and arrays are useful for the following:
Object – making code modular
Constructor/class – create a numerous amount of one particular object
Arrays – listing code
53. What is the difference between an object and a class/constructor function? Use code to demonstrate your response.
Object function – collection of variables and properties
Constructor/class function – creating multiple objects that all work independently of each other
ex : let obj = {
rect : 1,
rec2 : 4,
rec3 : 6,
rec4 : 25
}
console. log(obj.rec4);
ex : let names = {
name1 : Mary,
name2 : Bob,
name3 : Sue
}
console.log(names.name3);
54. What is dot syntax? Use code to demonstrate your response.
Dot syntax allows code to view the content/properties of the object.
ex: let objects = {
square : 22,
circle : 55
}
objects.circle
55. What is the keyword new used for?
The keyword new is used to create a new object using a constructor function.
56. What is a constructor? Where and when is it used? Use code to demonstrate your response.
A constructor is function that is used to create objects. A constructor function should be placed outside of both the draw and setup functions.
let circT = [];
function setup(){
createCanvas(400 , 400);
for(let i = 0; i < 10; i++){
function circle() {
this.x = random(0 , height);
this.y = random(0 , weight);
this.display = function () {
circle(this.x , this.y , 100);
}
}
function draw() {
background();
for(let i = 0; i < circle.length; i++) {
circle[i].display();
}
}
57. What is the this keyword used for?
The this.name – reference a value name to object name
58. Organize original code to include the main program in one tab and a class or constructor in another.Use in-line comments to walkthrough code.
59. What is an array?
An array is a list of values or data. These types of data include boolean, strings, and numbers.
60. What notation is used to denote an array?
The notation used to denote an array is [].
61. How do data types impact arrays?
Data types impact arrays as arrays are able to use and access multiple data types such as numbers, strings, and boolean.
62. What is an index?
An index is the location of each item within your array. Typically anything within your index will be assigned 0 and increment up from there.
63. Write code that declares, initializes and accesses elements in an array. Use comments to walkthrough code.
64. List two or three methods that can be called on an array. Describe how they manipulate the array.
The methods that can be used to call on an array are:
console. log – displays value of index
document.write – displays value of the index
this.length – displays how many items are in the array
ES 6, Local Servers, Version Control, Repositories, CLI and OS.
Questions marked with * can be skipped.*
65. What is a class? How is it distinguished for a constructor function?
66. What are the keywords let and const? How are they distinct from var?Workflow*
The keywords let and constant are variables. Let creates a new variable and allows the variable to be reassigned a new value, whereas constant once the value is assigned it cannot be changed. The variable var holds a value in memory.
67. What is a local server and why would one be used?
*68. How can you install and run code using a local server?
69. What is Node?
A node is a large package of JavaScript utilities, including a standalone JavaScript interpreter.
70. What is NPM? Give an example of a module that can be downloaded and installed from NPM.
NPM stands for Node Package Manner. A node.js is a package manager for Java.
71. List one text editor that can be used in lieu of an IDE. How can a P5 project be coded and run using a text editor?
72. What does CLI stand for?
CLI stands for Command Line Interface.
73. How can the current directory be identified using the command line?
To view the current directory you are in you can use the pwd. This will show you the path of your command line.
ex : pwd
/users/ace
74. How can the contents of a directory (current) be viewed?
The contents of a current directory can be used by using the command ls . That will allow you to see the contents of what is inside the directory.
75. What command must be used to make a directory or folder using the CLI?
To make a directory or folder you would use the command mkdir and the name of the directory.
ex: mkdir classNotes
77. How can recent commands be viewed on the command line?
You can view all the commands that were recently used.
78. What shortcut keyboard combination can be used to automatically complete a path in the commands line?
*79. How can a local server be started and stopped (state actual commands)?
80. What naming convention can be used to save an application or program?
81. What is GIT?
82. How does GIT distinct from Github or Bitbucket?
*83. What is the command to initialize a GIT repo?
*84. What is the difference between staging and committing in GIT?
*85. What is the difference between an untracked and tracked file in GIT?
*86. What is the difference between the npm init and git init commands?
Today, I took a crack at the Coding in the Dark Challenge. We were given a code and had to get certain aspects of it to work more efficiently. We were also given questions to answer to test to get a better perception on how everything blends together and how to make our code more concise and cleaner for the eye.
These were the following questions we were asked and my answers to them.
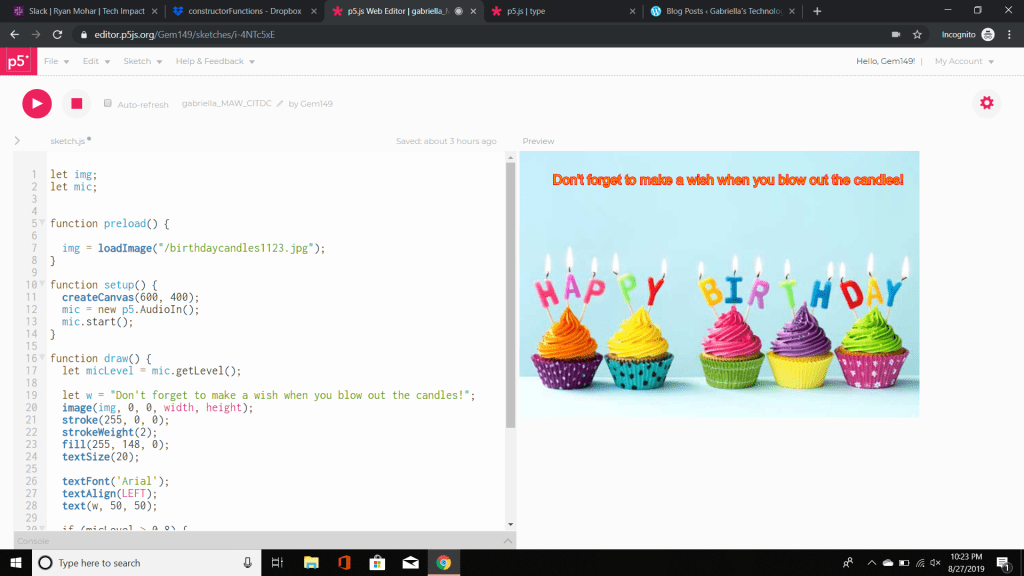
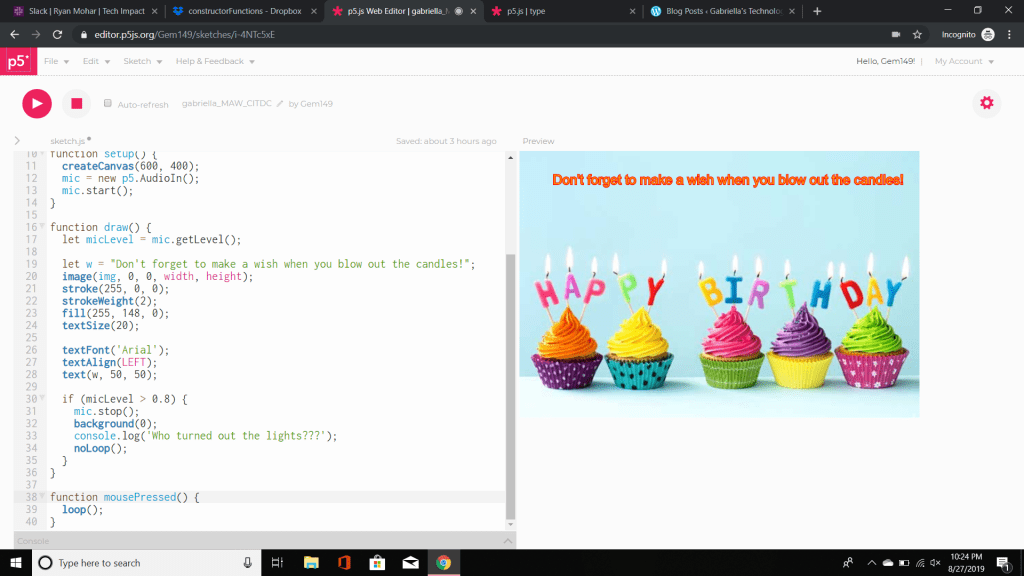
How will these variables (img and mic) be used? What is their scope? The variables that we are using are img and mic. The variable img will be used to store and later invoke the background image. The variable mic will be used to store and invoke the contents of the microphone. The scope of img and mic are global variables. What this means is the contents of the img and mic variables can be accessed and invoked and where in the code.
How does scope affect the program? The scope affects our program because the variables img and mic are used frequently in multiple functions. By making img and mic a global variable any function or line of code can access it when it is invoked.
How does this function (preload) /method work? Why is it placed before setup()? I made reference to the preload function in the P5.dom library. The preload function allows an image to be loaded and ready in the background before the setup function is ran. The preload command is as asynchronous loading of external files in a blocking wait. By placing it before the setup command the image will be ready to be invoked before the setup command will load any other code.
What is an alternative approach to loading the image? The alternative approach to loading the image is to look in the P5.js library under .dom. In the .dom library you can search the loadImage command. As we can see the loadImage is a command that P5 recognizes. Once P5 loads the results of loadImage we can see other examples of how we can proceed with loading the image with a different syntax. In this case we would discard the preload command and enter our commands in the setup function. That syntax is as follows function setup() { //here we use a callback to display the image after loading loadImage(‘assets/laDefense.jpg’, img => { image(img, 0, 0);}); }
What is happening in setup()? In this setup we are calling invoking the mic variable and assigning the audio received from the microphone to the variable mic. This appears to user as asking if it can access our microphone. The mic.start function turns the microphone on.
How can this code be improved for reusability? Modularity? Go ahead and improve it. For reusability you can assign each of the values to a variable. This would not only make the code clearer but more accessible when calling on the variable. You can improve the modularity of the code by creating an object and that contains text, functions, etc.
Where does this font come from? How does it work? This textFont is a variable recognized by P5. In the .dom library under textFont it states that fonts represented are web safe fonts. Web safe fonts are a font that is generally available across all systems. With that in mind as long as your system recognizes a specific font it is accessible. So for example Arial is known across platform so hence it can be used.
What logic is introduced here? How can it be improved? Go ahead and improve it. The logic that is introduced here essentially says that if the mic level received from the mic input is above 0.8 than the background changes and ‘Who turned out the lights???” is displayed in the console. This code can be improved by creating a function that sets a variable for what we want to happen when the mic.stops assuming that this is true than the image should go black and display the text. To be executed we would have to put the new function in draw.
How can the program be reset to its initial state? To reset the function to it’s initial state you can click the stop button followed by the play to execute your code.
How can the console be cleared? You can clear the console by first clicking the little arrow to make the console appear. Then implement your code to receive any text displayed. Once the text is displayed you can click clear next to the down arrow and the console will clear any content displayed.
What might be a drawback to using the following event-driven method/function? A drawback of the loop() is that it will have to stop the loop and replay it in order for the code to be ran in the draw command.
What alternative approach could be used? Go ahead and improve it. To fix this you can create a different function or change the loop type by adding an argument and adding it to the setup function which in turn should let the you go back and forth between the image appearing and going dark.
Attached below is our code as it was originally setup with no changes. Images of changes will be uploaded soon.
The first step for this project was to download the image. The next step was to go to sketch – add file -drag and drop file – upload – add image name in load image.
The next step was to modify the the code in this case I changed the font and text alignment. I than hit the play command to execute the code to make sure it works. It asked me to use my microphone which I accepted. From there I adjusted my sensitivity for the micLevel as it wasn’t originally working. After it was adjusted I blew into my microphone and the image went dark. In the console it displayed “Don’t forget to make a wish and blow out the candles!”.
Once I pressed the mouse the image came back up. In that case I knew everything ran successfully. From here, I started to apply my knowledge by answering the questions we were asked. I suggested ways in which we could implement change.
New code coming soon… these images will show the implemented changes to our code that were tidier and see if they have the same effect as our code above.
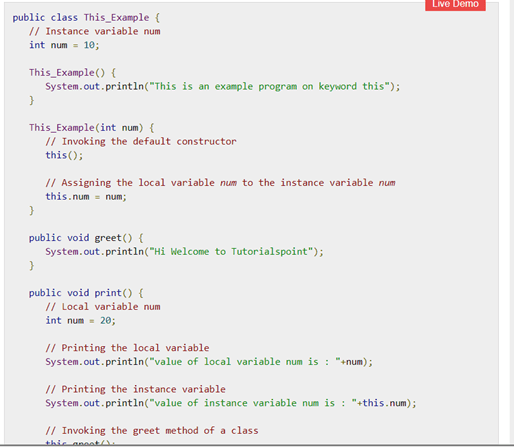
As Day 7 is coming to a close I feel a little disappointed at how quickly time is passing us by. In class today and in groups we worked on constructors. A constructors is a block of code that initializes the newly created object. However, a constructor is not a method as it does not have a return type. * Whereas, a method is a collection of statements that are grouped together to preform an operation. When a program invokes a method the program control gets transferred to the called method. The called method than returns the outcome of one of the two following conditions – when the return statement is executed or it reaches the method closing bracket. ** Often in a method you may see this.name statement. What this does is differentiates between global and local variables within a scope. In this case by using the this.name it allows the method to access the contents of the object and execute the information inside.
Check out the example below to see a method in action.
Image taken from reference 2. See link below. Image taken from reference 2. See link below.
The output of the method is displayed below.
Image taken from reference 2. See link below
As the method was able to access the contents of the object, the values associated with each variable was then in turn able to be displayed. Without the this.name you would not be able to access the contents stored locally or initiate them.
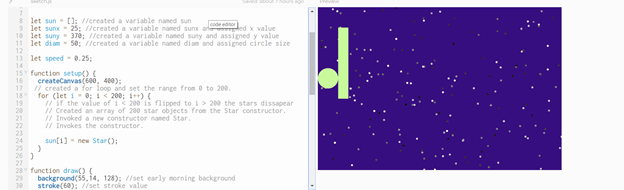
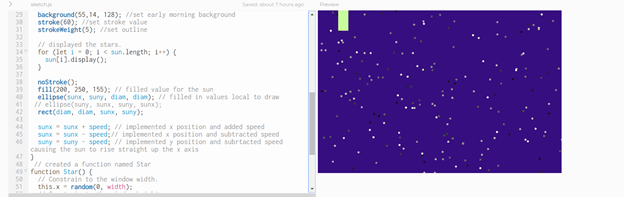
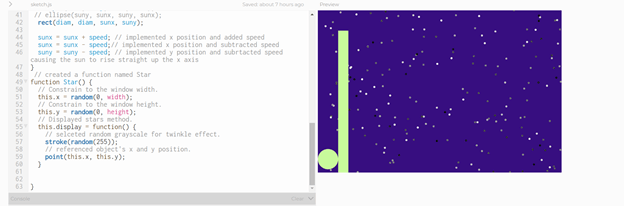
Attached below you will see an example of a group project that a classmate and I worked on using constructors. In this case we established all of our global variables before we proceeded to create a loop. In the loop we specified what arguments and parameters we want to use prior to creating our constructor.
Within the setup command we invoked our variable sun and set it to our array named i. We then created the name of our new constructor which we named Star. The new is the hint that we are creating a constructor. In the draw command we will create our background , stroke, and the stroke weight. Then we set the for loop for how we want the stars to be displayed. We then create our sun and rectangle. To make the sun and rectangle move we assign our x and y values to increase and subtract. This in turn allows our sun to move straight before disappearing when the edge of the canvas is met. Now you will see we invoke a method within our function star. In our function named Star we use the this.name. As we know in order to invoke a method a this.name is used. This is the dead giveaway. After the different methods are invoked we set the function to display. When all the code both local and global is invoked we get our image of a blue background, with shimmering stars, and moving shapes consisting of a circle or in this case our sun and a rectangle. The rectangle and circle almost remind me as if we were playing a psychedelic version of pong but missing a ball and player two. I hope this helped you to understand the difference between constructors and methods.
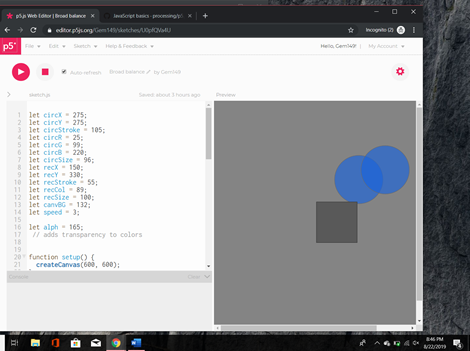
Today, was day 6 in my journey to become a front end software engineer. I learned how utilize and implement objects and arrays. What I liked about both objects and arrays is that they are clear, concise, and to the point. They make your coding look neater and more condensed. An array is a data type that can hold strings and numbers. When utilizing an array you can set the values locally to said variables. This will make the computer to have a complete and clear idea of where the variable is to be pulled from and placed. An object is another data type that can contain a number of values, variables, strings, loops, etc. When utilizing an object the computer will look to the object to pull the information that you have already preset. However, in order for the object to function properly you must specify where the computer should check the code. With an object the computer needs special permissions to see into the object in question. In order to not receive a syntax error you must let the computer know where to find your code. In this case if we had set an object as myCircle and we needed to plug in the x coordinate for our ellipse, we would tell the computer ellipse(myCircle.xpos , myCircle.ypos, myCircle.circSize.); In this case the computer will now peak into your object and search for the variable named xpos. Assuming that the name matches the computer will now pull this variable and place the information associated with it in the x position. The same goes for any other variable you call upon.
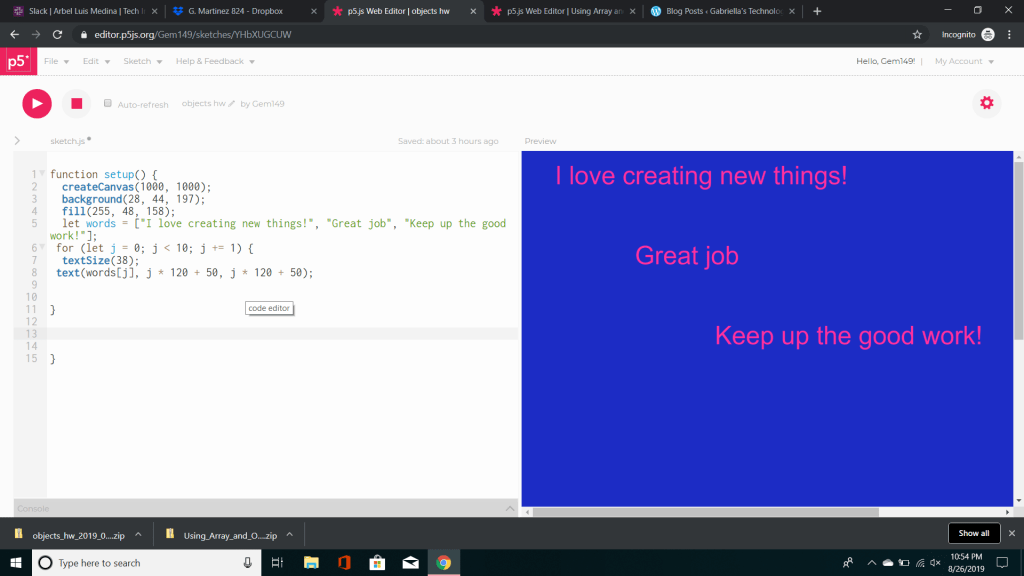
For homework I created an array to display some words that I wrote on the screen.
In this example I created an array named words. In the array words, I assigned the variables that I wanted to output. In order for everything to fit I increased the canvas size to 1000. Originally, I had it at 400 but words went missing due to the size constraint. I then created a background using the grey scale. I placed my array lower down my code so that it would appear on my background. I wanted my words to stand out so I used the fill command and entered random numbers for r, g, and b. I then put my array below it to allow the color change to take place. I proceeded to than add the syntax for textSize to increase the font of my words. Lastly, I went to display my text. In the text command I placed words which is my variable followed by j which is equivalent to my x followed by how much spacing I wanted between each string and where I wanted the string to go. The final product resulted in displaying my pink array on the blue canvas.
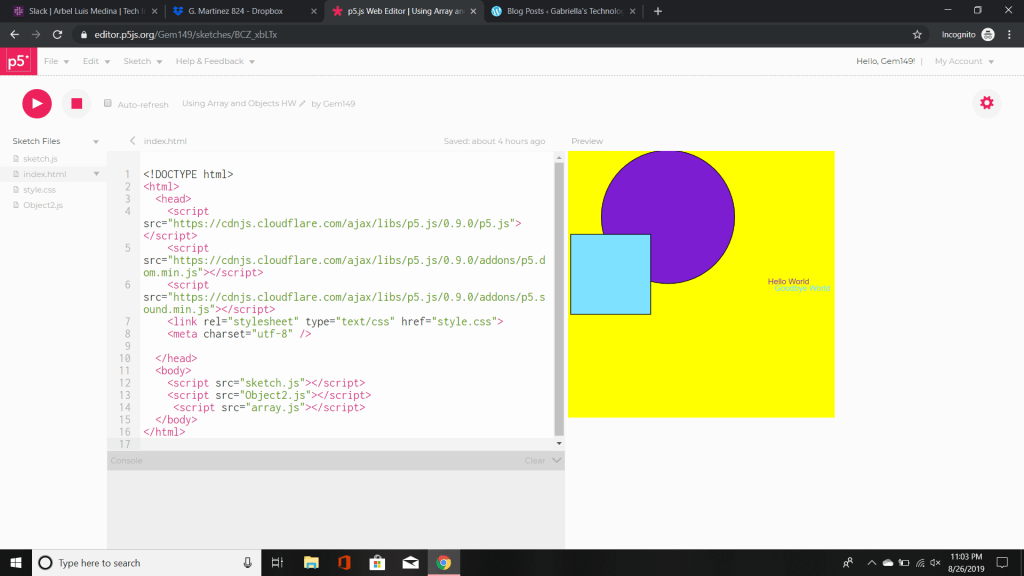
For the second part of the homework, I created an object that created both a rectangle and a circle before making them move across the screen. I also proceeded to add my sketch to the HTML which in turn could access my code from a different file.
Now, based on what you see above is the final product. It’s organized, concise, and complete. However, that’s not how it all started. In this case I worked from the bottom and made my way up. The first thing I did was create my object. In this case I created my first shape myCirc. In myCirc I listed all the variables that I planned on using including creating myCirc. In myCirc I put the key things that I would need in order to create my circle. That included x, y, circSize, r (red), g (green), b (blue), cnvBkg (canvas background) , and text. Once I created everything I went forward to execute this object but in order to do that I need to plug in the variables within my draw command. In order for the computer to read our object we need to give it permission to access the content being stored inside. To do that we must use the name of the variable in this case myCirc dot and the extension. For example in our images above we want the background to be able to pull the background color from cnvBkg. In order to do that we must tell the computer where to find the variable. So to do this we will type myCirc.cnvBkg. Now the computer can look inside and say hey this is what she is looking for lets take the information from the variable cnv.Bkg and execute it. Now, the reason that the computer needs access to your object’s variables is because the code within the variable is local. It cannot be accessed from anywhere in our code except from it’s source or class. This is different from our global variable which can be placed anywhere within our program. The computer can just pull the information down and apply. The downside of the global variable is that it is messy, uses a lot of memory, and can be reassigned. Whereas, our local variable is set to only our object. It can’t be changed unless we were to change them manually, the global variable even if given the same name as the one within our local variable would not change the information being held by our local variable. Getting back on track, before we run the image we will set the fill for the shape, create the shape, and fill in the information with our text including it’s location. For fun, I decided that I wanted my shape to move so I set the myCirc.x to += 1 and to -= 1. I then set myCirc.y -= 1. What this accomplished was it caused my circle to move straight up and off the canvas. When I took out the second myCirc.x -= and left everything else it caused the circle to move horizontal. The next step I did was create a new file. I went to sketch, add file, named file and added the extension .js. What this did was created a new pj5s file and displayed it on the left hand side tab. This gives us a completely blank canvas to use. But that’s not all by creating a new file we can continue to work on code and have it appear together by adding it to our html file. To do this we went to index.html. Once inside we went to our body. Inside our body was our sketch file, where we previously made our circle. In order for our new work to link with our current code I copied the syntax from our previous file and changed the name to match what we just named the file we created. Once this was complete I moved down the tabs on the left hand side of the screen and entered my new code. As before I then executed my code in the draw command. The outcome is what you see above, two strings of text, a circle that moves upward and a rectangle that moves left before disappearing off screen. I enjoyed working with objects and lightly dabbling with HTML. However, it takes a lot of patience figuring everything out as the smallest errors cause problems. My advice is keep your chin up and ask for help. There was a few moments where it literally came down to a colon here a this there and than it worked. Just keep trying and learning from your mistakes, its the only way that you’ll get better.
With Day 5, complete I feel like I’m finally getting there. I’m still a little bit unsure of what I’m learning but I’m trying through practice to get a hold on the topic we learned.
On Friday, we learned how to create a function. In order to truly understand what we were creating we set a guideline for what we wanted our code to accomplish. From there we will create a function with whatever name we want. The name should be relevant to what it is were trying to do. When we create a function be sure not to create it in the setup or draw. The function needs to be its own entity in order for it work. In the function you will create commands for the code to execute. Once complete, you will type the name of the function underneath the draw function to display your work. Below you will find an example of a function that I created based on what I learned.
Today, I will be going over how you create a function.
The first step is to open a new P5.js canvas.
This automatically sets you up with the function setup and function draw commands.
We’re going to start from here.
So for this project, we want to create two functions. We want to assign specific functions that we want the shape to carry out.
In this case we want to do the following.
/* Create a function that draws a rectangle to the center of the screen, color the circle red, outline is white, thickness is 3. Create a second function that draws a triangle anywhere on the screen, color the triangle blue, outline is yellow, thickness is 5. */
So for these circumstances, I want to make the canvas a bit bigger. We are going to adjust the standard size from 400 x 400 to 600 x 450.
Let’s create our code, below I rewrote what we would be doing so that I don’t forget our goal.
/Create a function that draws a rectangle to the center of the screen, color the circle red, outline is white, thickness is 3.
Create a second function that draws a triangle anywhere on the screen, color the triangle blue, outline is yellow, thickness is 5./
function setup() { createCanvas(600, 450);
//adjusted canvas size from 400 x 400 to 600 x 450 }
function draw() {
background(220);
myRectangle();
//need to define function and add it to the draw. otherwise nothing will appear. It is better to create the function first before adding it up here due to conventional order.
myTrig();
}
function myRectangle() { //we want to create a function name. In this case we are building a rectangle. I’m naming my Rectangle so that the coding doesn’t get confused with the rect command fill(“red”); /* if you know the short hand for the color your looking for in the reference you can type it inside the “” . Keep in mind that if this command isn’t exactly as it is in the reference it will not execute. You may be better off just entering the values in terms of the gray scale (R,G,B); strokeWeight(3);/ strokeWeight(3); /this determines the thickness around our object. The higher the number the thicker the outline gets. / stroke(0); // changed thickness to no thickness rect(width / 2, height / 2, 100, 100); / called on the rect command. used the built in width command and height command and divided by 2. the width and height command are equivalent to x and y. They determine their value based on the cordinates in the canvas size. Plotted the ending points. */ }
function myTrig() {
// created a function for trianle and named it myTrig
fill(25, 99, 255);
// filled the triangle with colors based on they grey scale to create blue
strokeWeight(5);
// changed the thichness of the outline to thicker.
stroke(255, 204, 0);
// changed the stroke from black to yellow using the grey scale
triangle(width / 3, height / 3, 30, 30, 2, 150);
/* called on the triangle command used the built in width command and height command and divided by 3. the width and height command are equivalent to x and y. They determine their value based on the cordinates in the canvas size. plotted the ending points
*/
}
Now that we created our code, let’s see if this gives us what we are looking for.
After looking over the image it appears that we successfully created two functions that meet the requirements listed above.
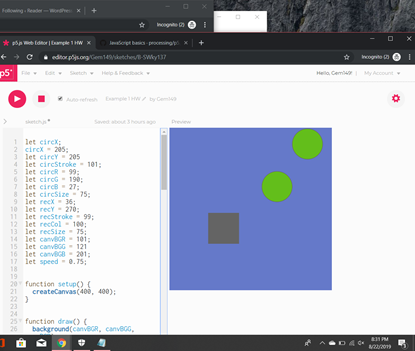
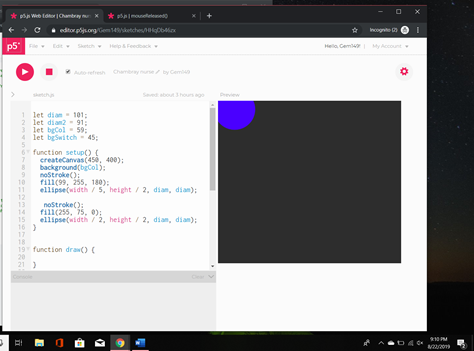
WoW! It’s been a crazy day, I learned so much my brain feels like it’s going to explode. In class we learned about the if command. We learned how we need to assign variables in the global variable first before making an argument. Depending on the outcome of the argument (true or false) the code will change and so will our image. I enjoyed working in groups as we are still new to this and every set of eyes counts. The intimate feel allowed me to ask my peers what they would do with the code or what they would change. I also liked working as a class because we all have different struggles with coding but we want to understand how things work to improve. In the homework, we got to see different variations of arguments, how a mouse pad works, etc. Attached below are the first five examples of code. I liked to be creative as I dabbled in adding extra code here and there.
Assignment 1 –
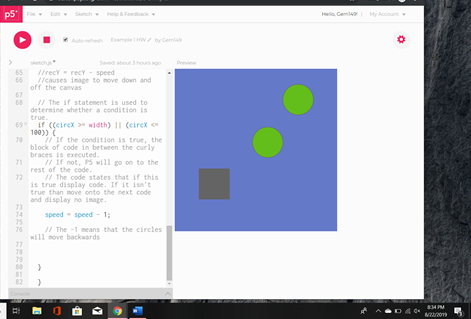
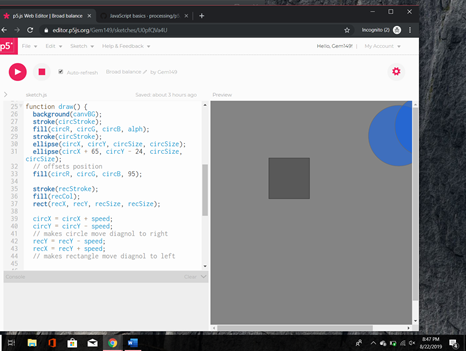
In example one, we learned about the if command. We learned that we must assign our global variables in order for our code to work. For learning purposes we declared the global variable at the top of our code. After we did that, we proceeded to creating our shapes, assigning color, and outline. We then assigned the speed of our shapes to the x and y axis. This will allow the shapes to move across the canvas. The last thing we did was assign the shapes to the if command. The if command in code tells the computer if this is done produce this. In our case we told the computer that if circX is greater than or equal to the width of the canvas or if circX less than or equal to one hundred take the variable speed and subtract it by one. This in turn would cause the image to move backwards as it reaches the edge of the canvas.
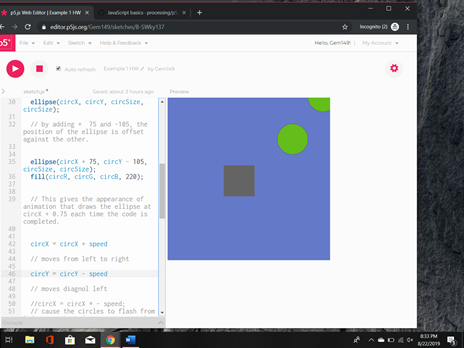
Example 2
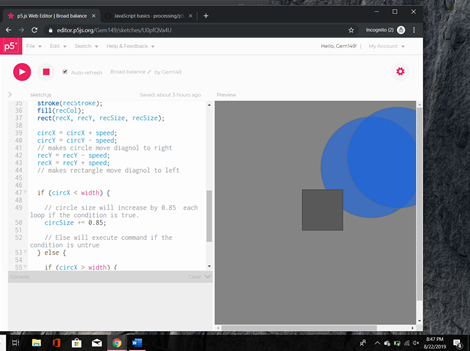
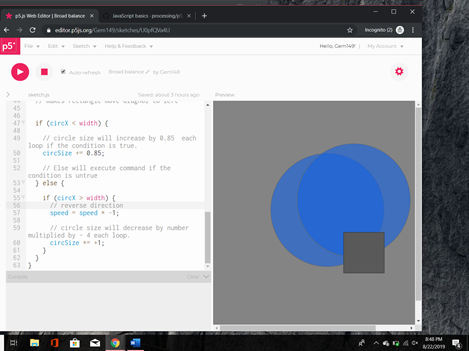
In example two, we learned about the if and else command. We learned that we must assign our global variables in order for our code to work. For learning purposes we declared the global variable at the top of our code. After we did that, we proceeded to creating our shapes, assigning color, and outline. We then assigned the speed to our shapes to the x and y axis. This will allow the shapes to move across the canvas. The last thing we did was assign the shapes to the if and else command. The if command in code tells the computer if this is done produce this. In our case we told the computer that if circX is less than or equal to the width of the canvas to change the circle Size to increase by 0.85. Now let’s talk about the else command. The else command is the opposite of if, for example the if command is supposed to do be true than command is executed. But if the command is false the else command will tell the code to do something else. In human terms, if the park is open we can go play. If the park is closed let’s get ice cream. When if is false the code associated with the command is ignored and the computer executes the commands listed under the else command. Now getting back to the example else if circX is greater than the width the speed will change to multiple by negative one. Essentially this would reverse direction if the statement was false. Then change the circle size to multiply by negative one.
Example 3, 3A, 3B
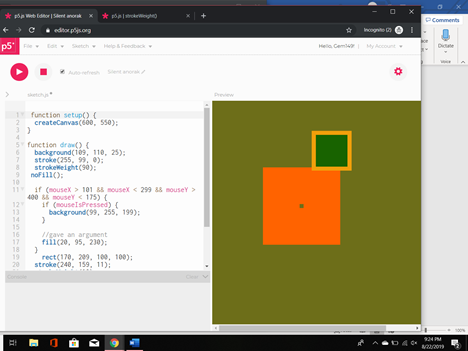
In example three we learned about the mousePressed and mouseReleased command We learned that we must assign our global variables in order for our code to work. For learning purposes we declared the global variable at the top of our code. After we did that, we proceeded to creating our shapes, assigning color, background and outline. We then set the shapes location by dividing the width and height by a number. This number will determine the shapes position by looking at the numbers from the createCanvas. It will then plot the circle on those coordinates before drawing the circle. After that we used the function mousePressed. When you click on the mouse the shape should change color and location. In this case the green circle should move to the corner and turn blue. The second circle I created which is orange has a function even if it doesn’t appear that way at first. Which leads me to the mouseReleased function. The mouseReleased function means that if I release my mouse something else should happen. In this case if I let go off the mouse my circle should turn purple and the background should change colors before taking it’s new position. Essentially, the mouseReleased changes the image as it is called upon when the command is called.
In example 3A we learned about mousePressed & mouseX and mouseY. In this example we created a background, stroke, strokeWeight, and no fill for our shape. We then set conditions in out if command to make the shapes move a certain way. The mouseX command holds the current horizontal position of the mouse relative to the canvas. The mouseY command holds the current vertical position of the mouse relative to the canvas. If touch was used instead of mouse input, mouse X and Y would hold the most recent touch point of x and y. In our example we are saying that if mouseX is greater than one hundred one and mouseX is less than two ninety nine and mouseY is greater than four hundred and mouseY is less than one seventy five than the background is the mouseIsPressed should change.
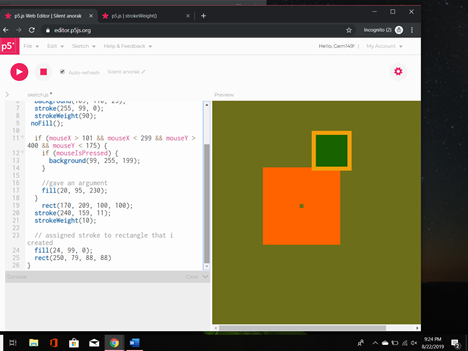
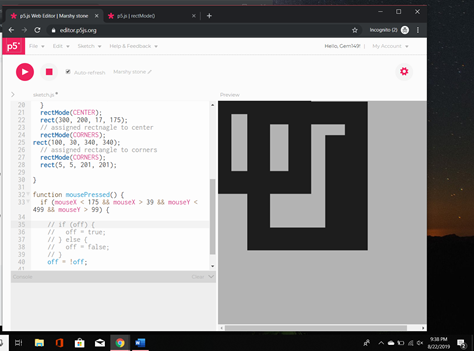
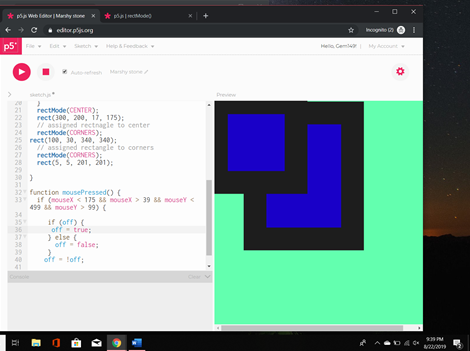
In example 3B we learned about using a variable to affect the outcome. We first assign variable off to true. What we are saying is that variable off is equal to the Boolean for true. Let’s move to the it and else command now. We are saying if the variable off is true let the background change to this color. If the variable off is false let the background change to this color. The next step is to create the next if statement. Before I move on just a quick recap about what mouseX and mouseY are. The mouseY command holds the current vertical position of the mouse relative to the canvas. If touch was used instead of mouse input, mouse X and Y would hold the most recent touch point of x and y. Now for the if statement, if mouseX if greater than two fifty and mouseX is less than three fifty and mouseY is greater than one fifty and mouseY is less than two fifty fill the background with these colors. The next thing we are doing is setting the location of the rectangle. So rectMode is the command to set the location of the rectangle. In reference to p5 rectMode(CENTER) places the rectangle in the center of the canvas whereas rectMode(CORNERS)sets the rectangle in the (CORNERS).Now we create our rectangles and place them under rectMode. Now we will utilize the function mousePressed followed by the if command. Quick recap mousePressed is called once after every time a mouse button is pressed over the element. Now to the if in our mousePressed, if mouseX is less than one seventy five and mouseX is greater than thirty nine and mouseY is less than four ninety nine and mouseY is greater than ninenty nine that off is true or else it is false. Outside the function we put off is equal to not true which makes it false hence displaying a different image.
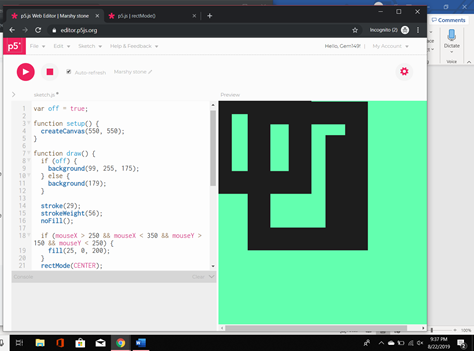
Example 4
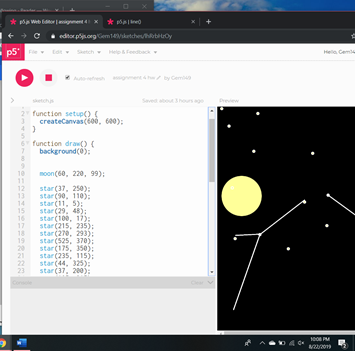
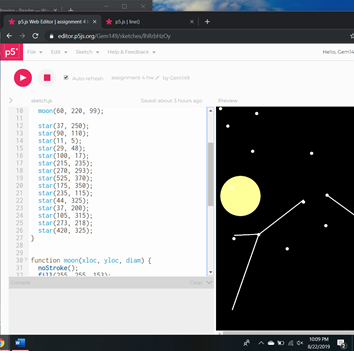
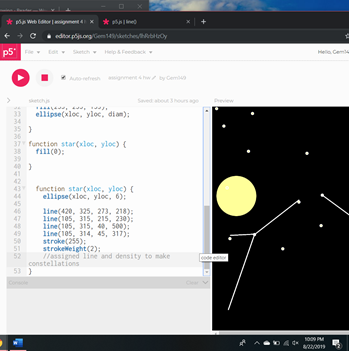
In example 4 we learned about creating functions and executing them. We learned what it takes to create and execute a file while being able to display the outcome. So first, we need to create a function, don’t worry about the process as in this case it is sometimes easier to start at the end and make our way forward. In this case lets start by making our functions. In this case we will call our function moon to keep it relevant to what we are creating. In the function moon we are going to put what arguments we want. So in this case moon has the arguments of xloc, yloc, diam. We are telling the function that moon will be using these arguments. Later when we put our function underneath the draw function for displaying our output we will enter these syntax. Moving along, within our function we will add the fill color of our moon, the stroke, and the shape of the moon itself. The condensed version of this will be how to create our stars. The image above has since had its code condensed to make life easier. The next function we will right is for our stars. See condensed code below.
function star(xloc, yloc) { stroke(900); point(xloc, yloc); }
In this condensed code we will be using we create the function star. Within the function we also put the arguments we are going to be using. In this case we are using xloc, and yloc that we will eventually use to create our star. We then created our stroke which is our color of said star before creating a point using the xloc and yloc. Now that we created both functions we are going to go back to function draw. In here we will put moon function along with the xloc, yloc, and diameter. We should than see our moon on the canvas. We will then add our star command as many times as we want to create stars. Just remember not to forget your arguments which consists of xloc and yloc. For fun I added inside the function star lines to make constellations. These lines as per p5 reference must include four points hence the reason there are four numbers in each line.
Example 5
In example 5 we learned how to create a function a log the output in the console.log. In this case we created a function named milesToKm(miles). We then proceeded to assign the variable km – miles + 1.2; within the function. This will take the outcome of km and return it to the screen. We then moved to setup and created a local variable called km and assigned it to our function milesToKm before assigning the number of miles. We then tell the console to log the results which are then displayed to us. We than create another local variable named km2 and assign it to our function milesToKM before assigning the number of miles. We than tell the console to log the results which are then displayed to us. We also say in the function setup to log the milesToKm token with the miles from our other function with another 99 miles. By executing these commands in the setup they will not loop rather they will only execute once when the program is run.
Example 6
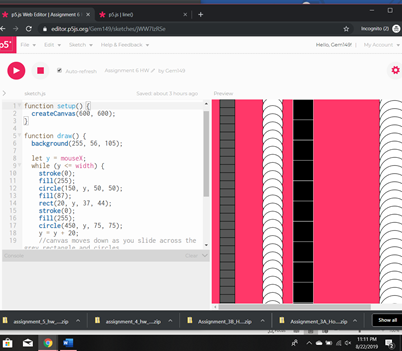
In example 6 we learned about the for loop. For condensing purposes I will only go over one of the shapes I created. The first thing to do is within draw select you background. Once that’s created we can start working on our shape. In this case we are going to make a variable y and set it to the command mouseX. Quick recap about the mouseX command – the mouseX command holds the current horizontal position of the mouse relative to the canvas. So before we go forward lets talk about the while loop. The while loop employs a Boolean test that must evaluate to true in order for the instructions in the curly brackets to be exhausted. Back to the while command, we are saying that if y is less than or equal to width do the following fill the shape, change the outline color, and create the circle. You are then going to type y = y + 20 or any number. This will make the shape move down the y axis so much. So before we go forward lets talk about the for loop. The for loop is used to check for certain conditions and then repeatedly execute a block of code as long as the conditions are met. In this case we are saying the variable y minus zero. If y is less than or equal to the height than add fifty to y. If this condition is correct than add this outline, fill, and create shape. If not then these commands will be overridden and dismissed. This will than appear in the continuous loop.
Example 7
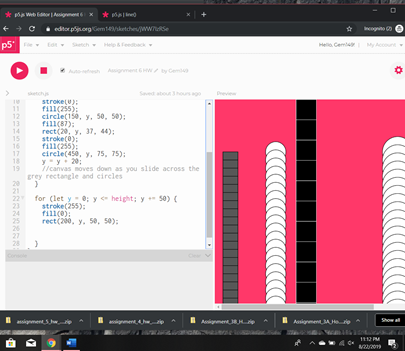
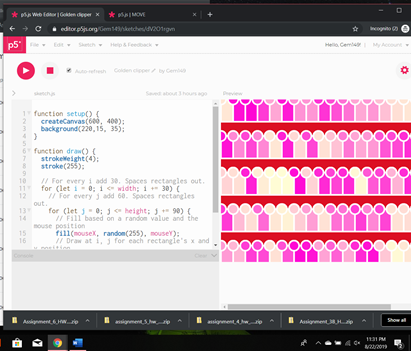
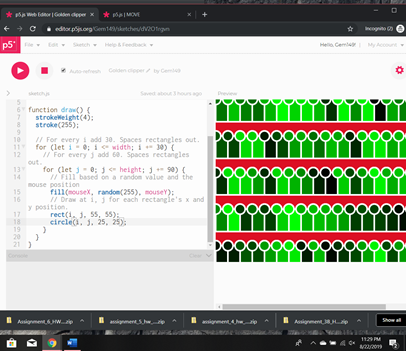
In example 7 we learned about a nested for loop. A nested for loop is a for loop with another for loop. The for loop will still run like any other for loop multiple times. In this example we use industry conformation for x and y which in this case is i and j. In the first for loop we establish the variable i and set it to zero. We than add to the argument and say that i is less than or equal to the width. If that is true add thirty to i. In the nested loop we are doing the same but for the variable j. We are establishing j and assigning it to 0. We the add to the argument by saying that j is less than or equal to the height. If that is true than we want to add ninety to j. Inside the nested loop we use the fill command and add three arguments mouseX, random(255), which assigns a random number ranging from 0 to 255, and mouseY. What we are saying is that the fill of the shape can be any color and will change as the mouse moves along the x and y axis. Last but not least we are creating out shapes. Remember that our i and j are the same as x and y. In this case a circle and rectangle have the same number of coordinates. An x, y, width, and height. So for our example for both shapes we will use i, j, and two numbers. Typically, I prefer them to be the same to make the shape look symmetrical but that doesn’t have to be the case. Now let’s see the result, you may notice that their is significant spacing between the shapes and background. That happens when you add or subtract in you for loop. Essentially, for the i or j will change due to restructure of the axis.
Today is Day 3 of the OpenCode: Tech Hire Program. My classmates and I went to a Meetup for Techies. Luckily for us, we found a meetup group that worked with all our schedules and gave us a sneak peak about what we would be learning in the upcoming weeks.
The location of the event was near Canal Street. Luckily for me, it wasn’t far from the train station and the inside of the building was trendy. The company hosting the event was called CodeSmith. I got their approximately five minutes before the meetup started. I was pleasantly surprised to see the turn out. I counted about twenty five people or so. What I didn’t expect to see everyone so dressed down. I get that the tech community has its own style but I was thinking that people would be dressed business casual as it was hosted by an origination. I decided that I would sit with my fellow classmates, which landed me in the corner of the room as the seats were filling up quickly. Which overall was okay, as I was not trying to attract to much attention to myself.
At approximately 6:40 the introductions started. The gentleman had us introduce ourselves and what we were interested in learning. He briefly spoke about the program they offered through their organization but I didn’t quite catch everything. According to my fellow peers, he was speaking about a JavaScript program that they offer that consists of 12 weeks for approximately 17,000 dollars. Which overall didn’t seem horrible for the length of time, but I honestly don’t know how I would be able to retain so much knowledge in such a short amount of time. He then proceeded to show us some of the previous graduates from the program and how successful they are. A few slides later and we were looking at a JavaScript problems that needed some solving. The man went over the basics and then some. Funny enough in class today, we briefly spoke about arrays, variables, and Boolean conditions. In the problem on the screen we used all of these techniques to find out whether or not the array was true. We also learned about the terms if, for, nor and math calculations such as add, subtract, divide, etc.
After about an hour, all the information became a little bit much. Between the eight hour day of in class training and the meetup I was exhausted. If circumstances had been different I would have stayed longer but unfortunately, it was just not physically possible. I did feel more confident about my work after meeting other aspiring developers. I also felt like the meetup group reinforced some of things we had just started learning. I felt like I understood the material better and was happy that people asked questions and we were able to back track if you were confused.
I would do another meetup given the opportunity. The next time I will try to find one that fits into my schedule so that I can stay for the full duration and make a few new contacts. Overall a great opportunity and I learned a lot.
This next section covered in class today, was making shaped move across the canvas. We learned in class that it is important to assign a variable to name. This allows the reader to understand what they are coding and to let the computer know how to read the code. The format for creating a variable is as follows function – name – argument. (Example : let c = 5;). A variable is an empty shell or container that can store a name, number, or object. In our case we assigned numbers to our variables name. The variables in this case held the coordinates, background color, colors, etc. We also briefly touched on the difference between let and constant. Let is interchangeable as the value can be reassigned or changed if another command uses the same variable. Whereas, constant will lock the variable information not allowing any other variable to access or change what has already been assigned.
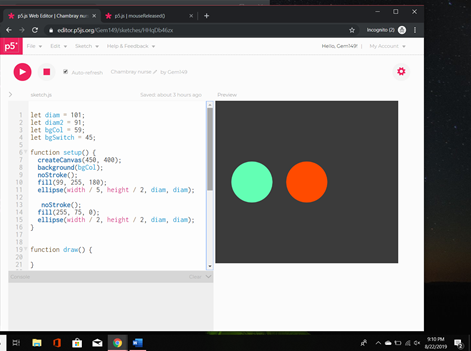
In the image above I created variables and assigned them a number from 0 to 255.
In the next image, I created shapes and applied my variables to them. In the two images above neither of the images moved. They were flat and only utilized the technique of applying our knowledge of variables.
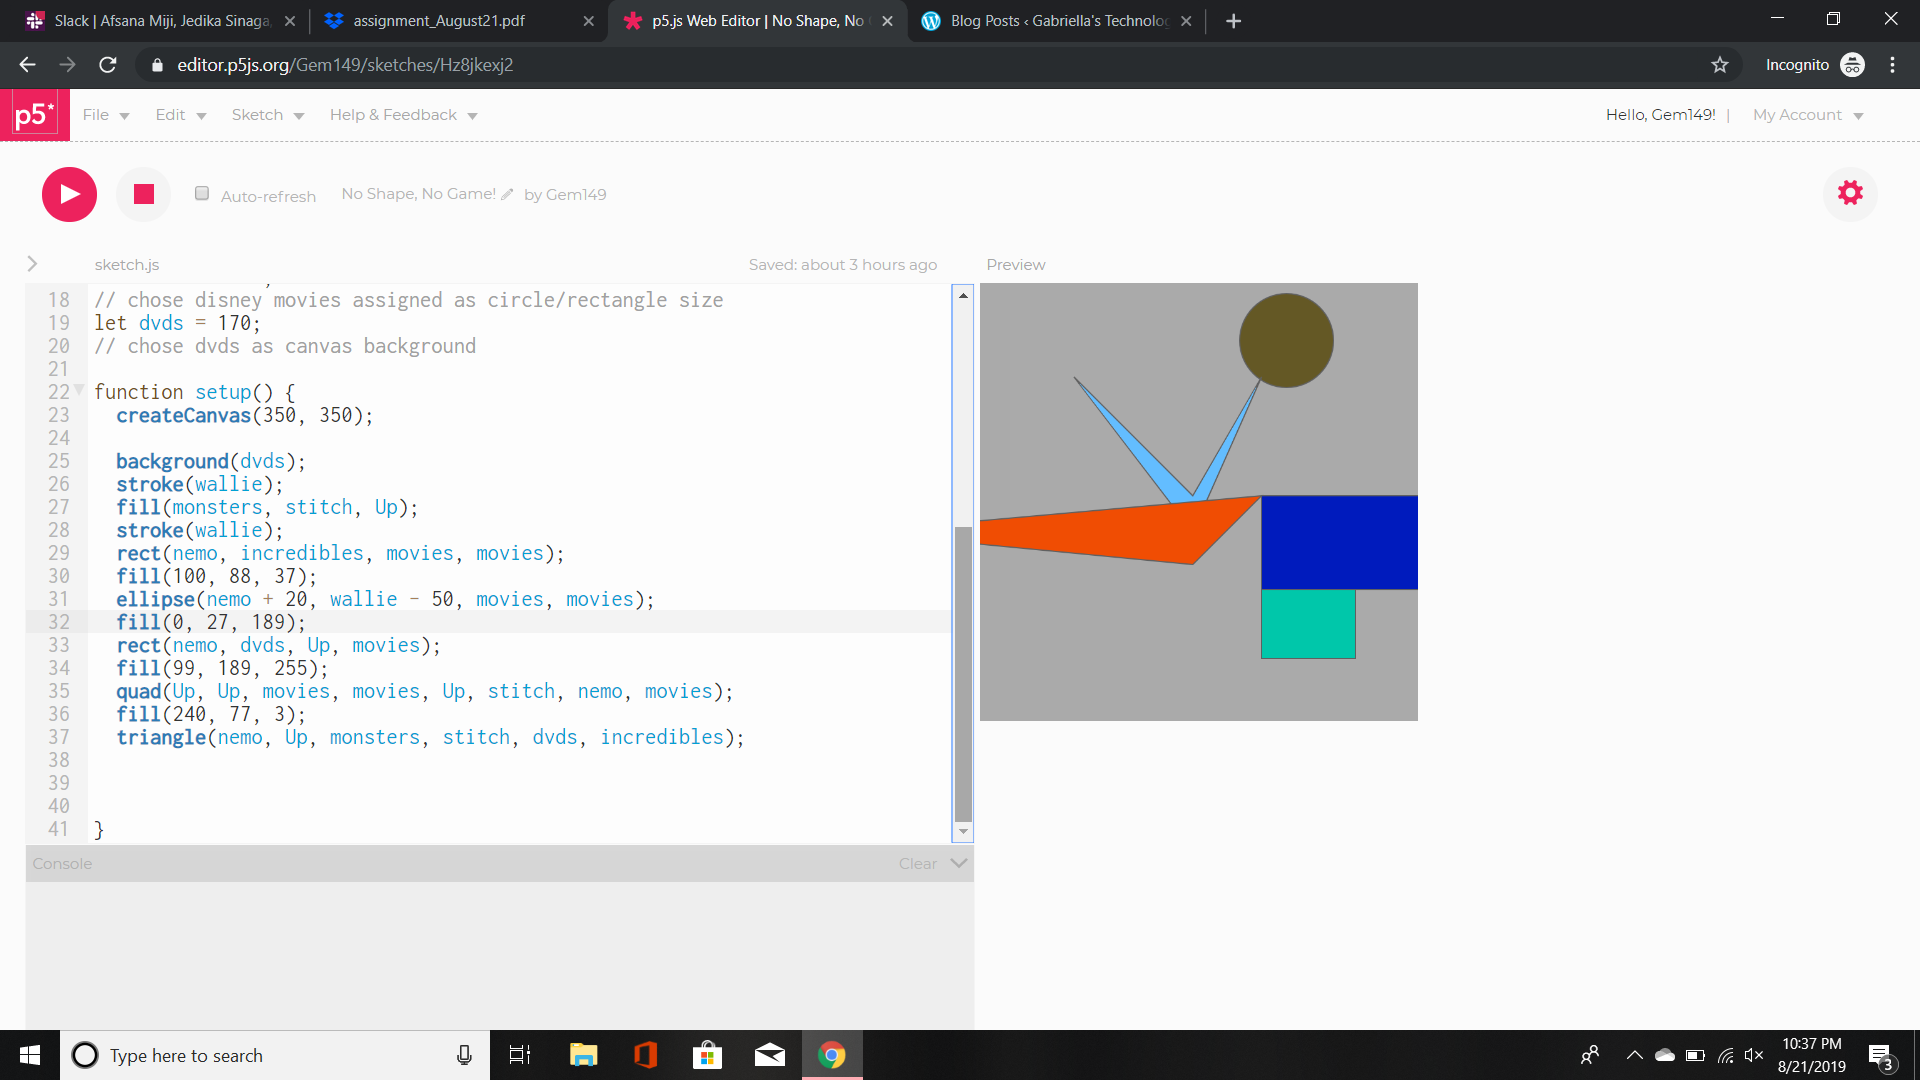
circle moves to right; rectangle moves diagonal right hand corner
The image above shows my disney/pixar inspired variables. I picked random numbers that I liked and applied them to the variables in the global variable. Once the code was ran, my commands were executed. The result was that the circle moved to the right and the rectangle moved diagonally to the right hand corner of the canvas. In this canvas the image is constantly moving and changing due to the loop within the draw command.
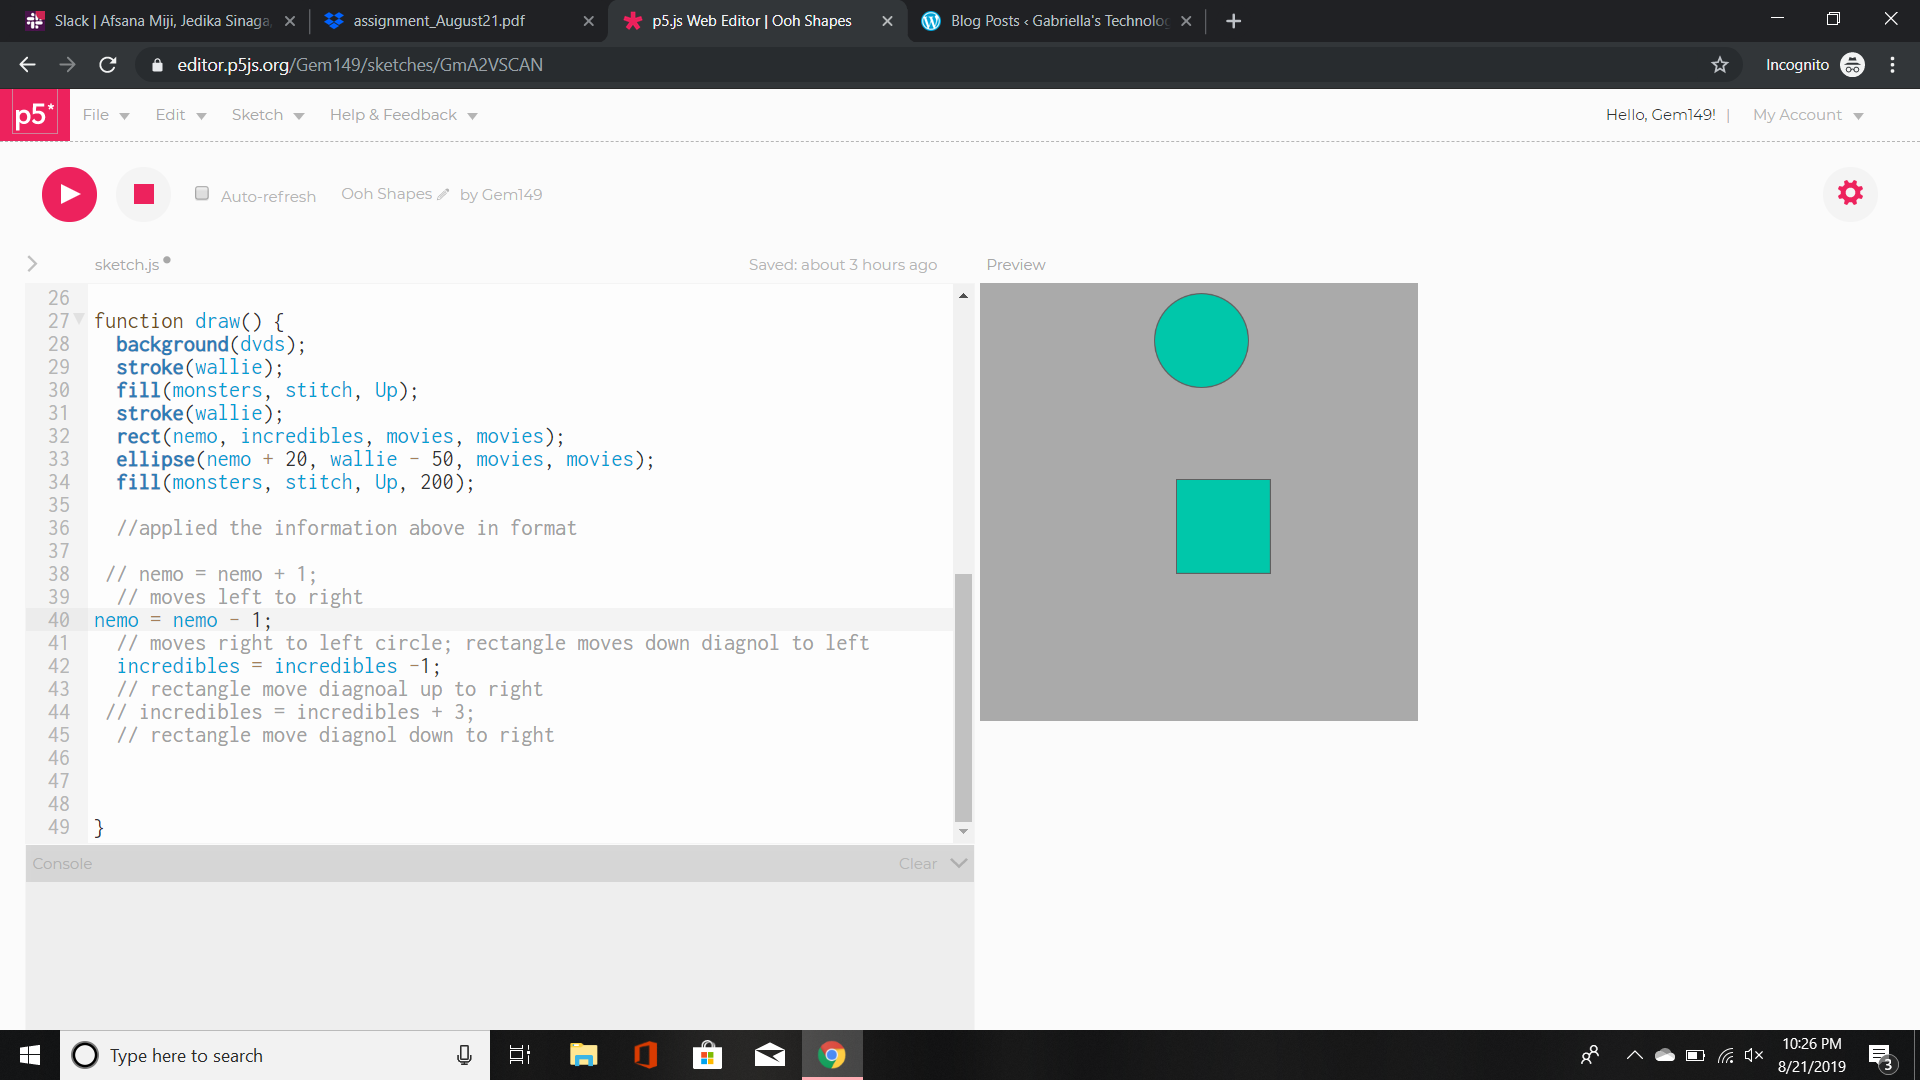
circle moves to left; rectangle moves to left upper hand corner diagonal
The next image demonstrates the loop that causes the circle to move backwards or rather to the left. Whereas, the rectangle moved diagonal upper left hand corner and at one point even intercepted the circle.
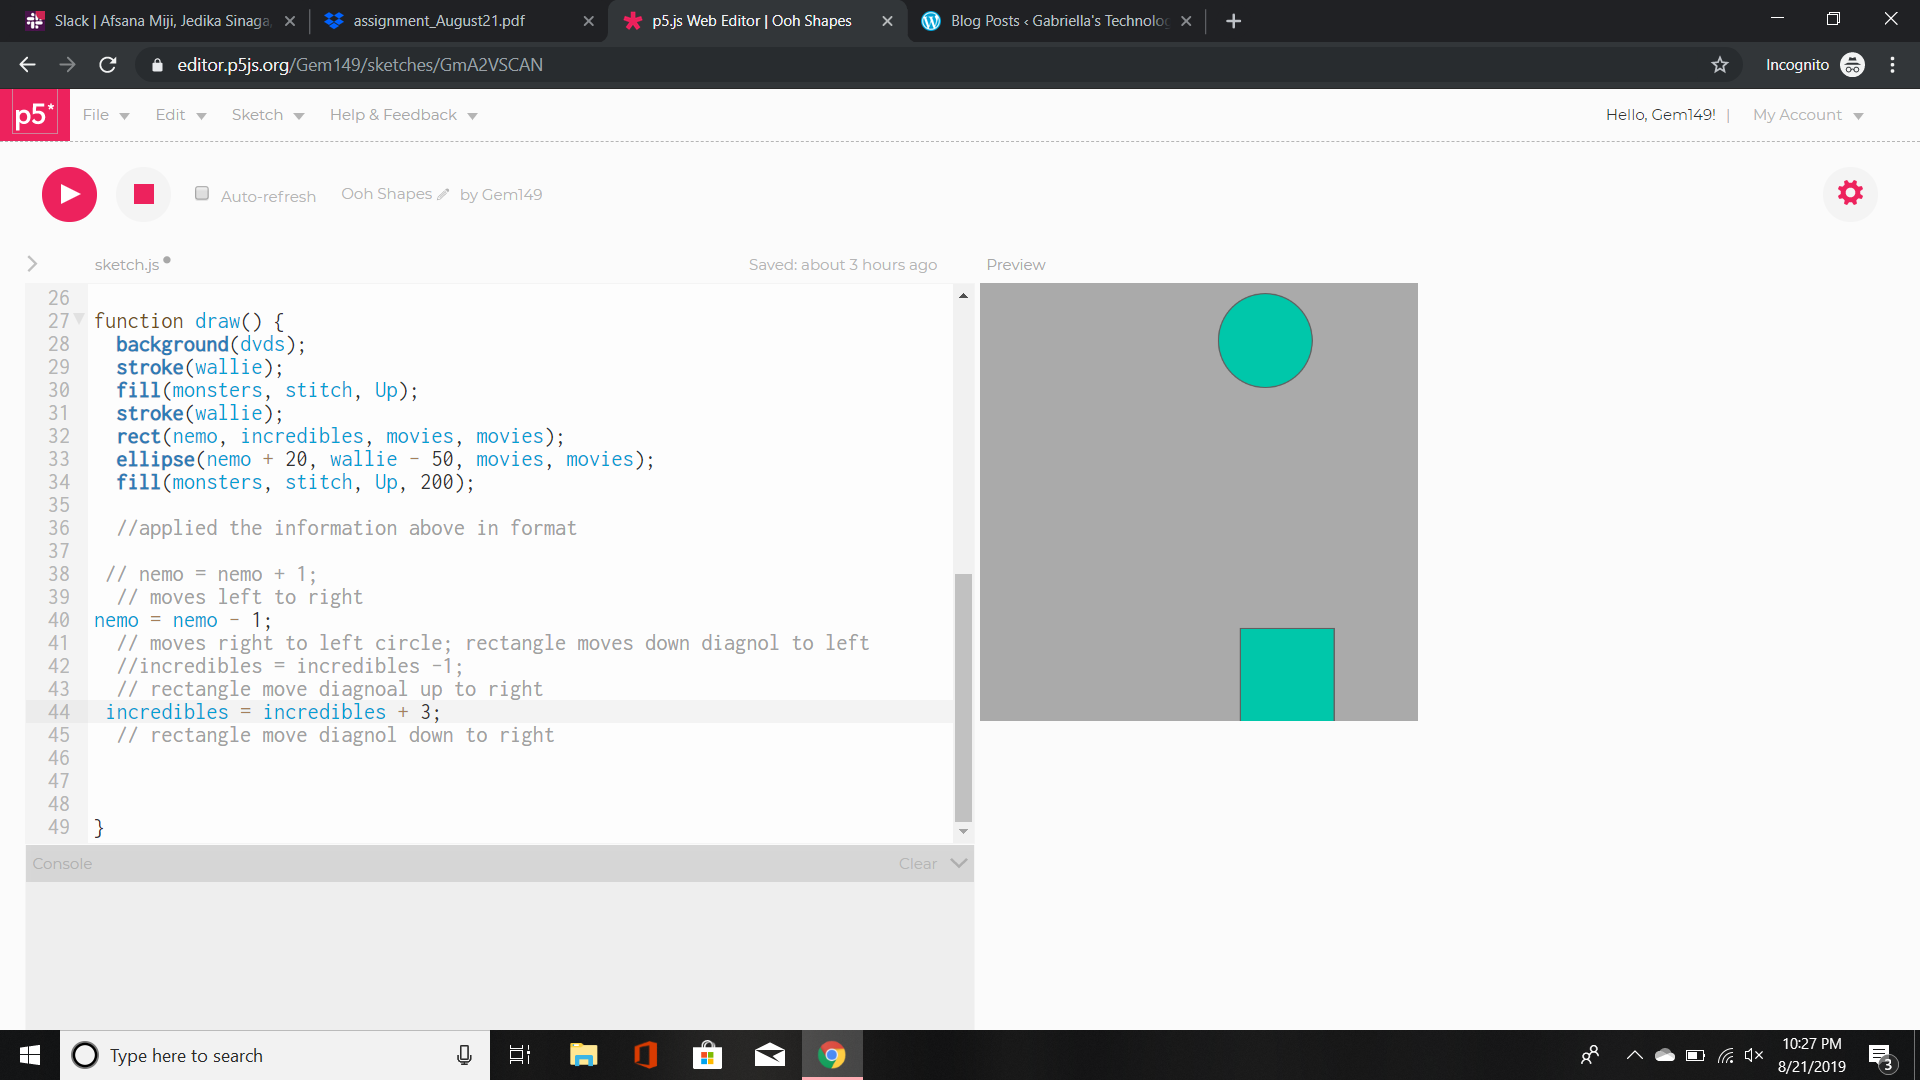
Circle moves to left ; Rectangle moves diagonal to left bottom corner
The last image in the loop caused the circle to move to the left and the rectangle to move diagonally to the bottom left hand corner.
The main issue that I’m finding is how to not loop the movement of the shapes.
Update: I learned that you can place the commands in function setup and they will only be executed once, hence no loop.


 Okay, so let me explain. I uploaded my picture from my camera to my repository. Once it appeared in Atom in the assigned repository I was able to access the image. So now, I want it to appear on my HMTL file. To do that I used the command img src which is short for image source and the name of my image and it’s extension. Please make sure your extensions are accurate! I added alt, which will only appear if my image isn’t correct, missing, extension wrong, etc. Then I added the width and height of my image. This will display the image based on the information above. There are many ways to use width and height but I won’t be covering it in this project. Next, I will close my . You should now see the image in the exact spot as the width and height coordinates within the body.
. You should now see my restaurant’s description below my image.
Okay, so let me explain. I uploaded my picture from my camera to my repository. Once it appeared in Atom in the assigned repository I was able to access the image. So now, I want it to appear on my HMTL file. To do that I used the command img src which is short for image source and the name of my image and it’s extension. Please make sure your extensions are accurate! I added alt, which will only appear if my image isn’t correct, missing, extension wrong, etc. Then I added the width and height of my image. This will display the image based on the information above. There are many ways to use width and height but I won’t be covering it in this project. Next, I will close my . You should now see the image in the exact spot as the width and height coordinates within the body.
. You should now see my restaurant’s description below my image.
